One of the most lovable thing about Nexus devices is that these devices are bootloader unlock-able right out of the box. There’s no requesting from the manufacturer for a bootloader unlocking PIN and there’s no carrier limitation either. You can unlock bootloader and re-lock bootloader on your Nexus 6 at your will.
Why unlock bootloader? Well, if you’re anything like a pro user or love to customize your device your own way then unlocking the bootloader on your Nexus 6 is the way to begin that journey. All things like root, custom recovery, custom ROMs, Mods, etc. begin with unlocking the bootloader on your Nexus 6.
Basically, by unlocking the bootloader on your device you allow Fastboot commands to be initiated on your device. Fastboot allows you to flash/update bootloader, radio, boot, cache, userdata and system images, and also erase userdata (format device) or cache. You shouldn’t do anything in Fastboot unless you’re a pro or you’re following a tutorial.
Bootloader unlocking on Nexus devices has always been the same, a one line command in Fastboot mode: fastboot oem unlock. However, with Android 5.0 Lollipop this now requires an extra step. To be able to unlock the bootloader on your Nexus 6 (which ships with Android 5.0 Lollipop) you need “enable OEM unlcok” first from developer options under your device settings.
This extra measure of enabling OEM unlock from device’s settings makes your device more secure than ever. Previously, anyone who had access to your phone could just boot your device into Fastboot mode and unlock the bootloader using “fastboot OEM unlock” command, which completely erases your device and brings it back to factory settings. Meaning, if somebody stole your device, he could just wipe out your anti-theft apps by unlocking the bootloader. But, no more!
Now with this extra step of first enabling the OEM unlock from settings ensures that if your bootloader is locked, and you’ve a password (PIN, Pattern, etc.) on your lockscreen, then nobody can modify or format your device in any way. This is great layer of security normal users using Nexus 6. Thanks Google!
Enough talk? Okay, let’s show you how to unlock unlock bootloader on your Nexus 6.
DOWNLOADS
ADB and Fastboot files (919 KB)
File name: adb_and_fastboot_files.zip
INSTRUCTIONS
WARNING: Warranty may be void of your device if you follow the procedures given on this page. You only are responsible for your device. We won’t be liable if any damage occurs to your device and/or its components.
Important Note: Backup important files stored on your Nexus 6 before proceeding with the steps below, as unlocking the bootloader will completely wipe/delete all files on the device.
STEP 1: ENABLE OEM UNLOCK
- Open Settings on your Nexus 6, scroll down to the bottom and select“About phone”.
- Enable developer options by tapping the “Build number” seven times.
- Press back button and select “Developer options” which should be now visible above “About phone”.
- Tick the checkbox next to “Enable OEM unlock”
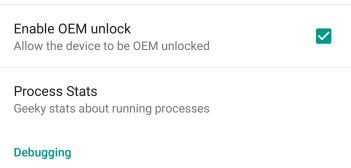
- Done! And while you’re here also enable USB debugging, tick the checkbox next to USB debugging.
STEP 2: UNLOCK BOOTLOADER
- Make sure you enabled USB debugging from developer options as told in Step 5 above.
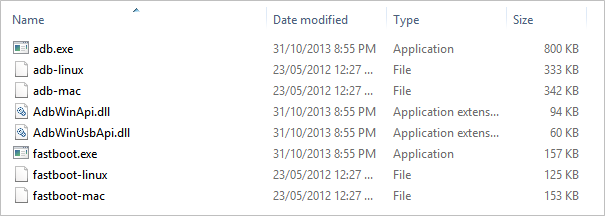
- Extract/Unzip the adb_and_fastboot_files.zip (using 7-zip free software, preferably). You’ll get the following files:
- Connect your Nexus 6 to PC using a authentic USB cable (preferably, the original cable that came with your Nexus 6).
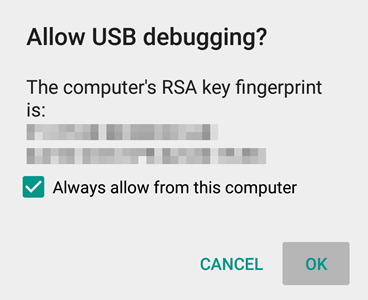
- You might get an “Allow USB debugging” request on your Nexus 6. Tick the checkbox “Always allow for this computer” and accept the request by pressing “OK” (see screenshot below):
- Now open the folder where you extracted the adb_and_fastboot_files.zip file.
- Open command window inside the folder by pressing “Shift + Right click” on any empty space inside the folder, and select “Open command window here” from the context menu.
- Now reboot your Nexus 6 into Bootloader/Fastboot Mode by issuing the following command:
adb reboot bootloader
- Once your Nexus 6 boots into Bootloader Mode, issue the following command to unlock bootloader
fastboot oem unlock
- A screen will show on your Nexus 6 asking for your confirmation to unlock bootloader. Press Volume UP button to accept and confirm.
- Your Nexus 6 will automatically reboot. While rebooting you may see a screen saying “Erasing”, it’ll be over in a few seconds/minutes.
- You’ll see the bootloader Screen again with device state now showing “UNLOCKED”
- Now reboot your Nexus 6, by issuing the following command:
fastboot reboot

That’s all. Enjoy!

Nice!
Nice!
Nice!