The Nexus 9 is out and in hands of consumers now, and given the popularity of Nexus devices among pro Android users it wouldn’t be surprising if most Nexus 9 owners are busy unlocking bootloader and trying to root their new Nexus 9 already.
Thanks to Google, unlocking bootloader on Nexus devices has always been a an easier thing. However, with Android 5.0 onward you’ll now have to enable OEM unlock from developer options first to be able to unlock bootloader on Nexus 9. This doesn’t make the process complex though, it’s just one extra step before you do the fastboot oem unlock in fastboot mode.
It’s another thing that fastboot is now dependent on the system settings set by user. Fastboot commands like flash boot, recovery and system only works when you’ve unlocked the bootloader on your device, but unlocking bootloader now requires enabling OEM unlock from developer options first, so unless you’ve done that, you might not be able to revive your device by flashing a factory image if anything goes wrong and your Nexus 9 isn’t booting up.
Anyway, if you’re new to bootloader unlocking and stuff, follow our step-by-step guide below for help.
DOWNLOADS
FASTBOOT AND ADB FILES (919 KB)
File name: adb_and_fastboot_files.zip
INSTRUCTIONS
WARNING: Warranty may be void of your device if you follow the procedures given on this page. You only are responsible for your device. We won’t be liable if any damage occurs to your device and/or its components.
Important Note: Backup important files stored on your Nexus 9 before proceeding with the steps below, as unlocking the bootloader would completely wipe/delete all files on the device.
STEP 1: ENABLE OEM UNLOCK
- Open Settings page on your Nexus 9, scroll down to the bottom and select “About phone”.
- Enable developer options by tapping the “Build number” seven times.
- Press back button and select “Developer options” which should be now available above “About phone”.
- Tick the checkbox next to “Enable OEM unlock”
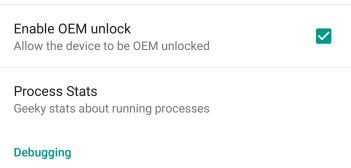
- Done! But while you’re here also enable USB debugging, tick the checkbox next to USB debugging.
STEP 2: UNLOCK BOOTLOADER
- Make sure you enabled USB debugging from developer options as told in Step 5 above.
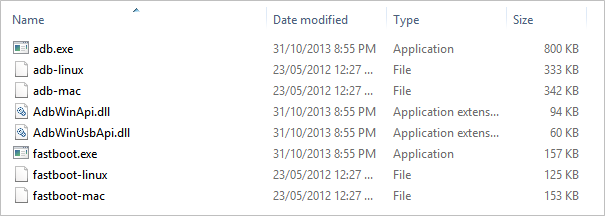
- Extract/Unzip the adb_and_fastboot_files.zip (using 7-zip free software, preferably). You’ll get the following files:
- Connect your Nexus 9 to PC using a authentic USB cable (preferably, the original cable that came with your Nexus 9).
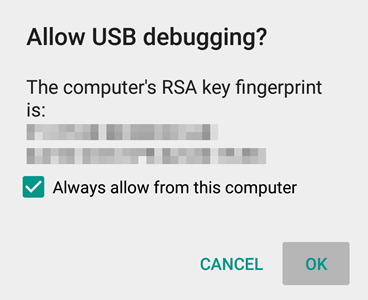
- You might get an “Allow USB debugging” request on your Nexus 9. Tick the checkbox “Always allow for this computer” and accept the request by pressing “OK”
- Now open the folder where you extracted the adb_and_fastboot_files.zip file.
- Open command prompt window inside the folder by pressing “Shift key + Right click” on any empty space inside the folder, and select Open command window here from the context menu
- Now reboot your Nexus 9 into Bootloader/Fastboot Mode by issuing the following command:
adb reboot bootloader
- Once your Nexus 9 boots into Bootloader Mode, issue the following command to unlock bootloader
fastboot oem unlock
- A screen will show on your Nexus 9 asking for your confirmation to unlock bootloader. Press Volume UP button to accept and confirm.
- Your Nexus 9 will automatically reboot. While rebooting you may see a screen saying “Erasing”, it’ll be over in a few seconds/minutes.
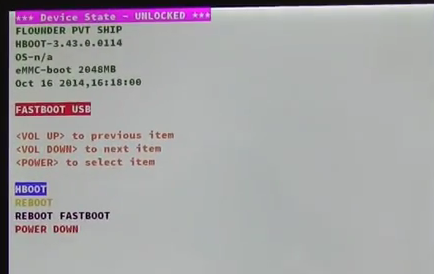
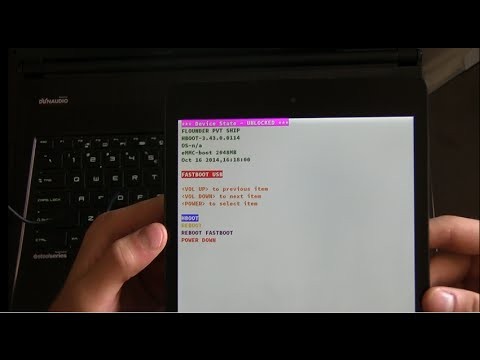
- You’ll see the Bootloader Screen again with device state now showing “UNLOCKED”
- Reboot your Nexus 9, press Volume down once to highlight REBOOT and then press the power button to confirm reboot.

That’s all. Enjoy!
VIDEO
Thanks to QBKING77 over at YouTube for making a video showing how to unlock bootloader on Nexus 9. Take a look:


