Rooting an Xperia device isn’t a fair game. It could be easy sometimes for bootloader unlocked devices, but not for the locked ones. Sony often patches root exploits in their OTA firmware upgrades making the whole process of rooting more challenging for the developers and users alike.
But anyway, as long as we’ve the wonderful community of third-party developers with us — we’re not going to be stuck without root. These guys always crack it!
By rooting your device you’ll be able to install modified Sony firmwares and various mods and tweaks which gives performance boost and adds a heck lot of customization options. Basically, with root access on your device you can modify the system files and discover more of your device. Other than that, there are many cool apps on the Play Store that take advantage of root access on Android devices and increases productivity by a hundred times.
However, all that awesomeness about rooting comes with its price. By rooting your device you technically modify the official Sony firmware that came loaded with your device. So by modifying it you take the risk of bricking your device of which Sony takes no responsibility because of the modified software on the device.
Warning!
This page is only meant for the Sony Xperia Z. Do NOT follow the procedures provided on this page for any other device than Xperia Z.
And if anything given on this page damages your device and its components — you only will be held liable for it. theAndroidSoul.com takes no guarantee for the safety of your device.
ROOT XPERIA Z
Because Sony often patches root exploits in newer firmware releases it sometimes gets tricky achieve root on them. But thanks to DoomLord for his dedicated work on Xperia devices and always discovering new root exploits for Sony’s firmware releases.
The most recent firmware upgrade pushed to Xperia Z was 10.3.1.A.0.244 which put a stop on previous root exploits that worked for Xperia Z. A perfect root exploit still hasn’t been discovered for it yet, but DoomLord found a pretty neat workaround for it. It’s lengthy though.
Root Xperia Z Firmware 10.3.1.A.0.244
Gaining root access on older firmwares could be done using one click batch scripts but for the latest update (.244) you’ll need the help of Flashtool as well. So let’s first download Flashtool:
Download and install Flashtool
→ Download Flashtool (113MB)
- Install Flashtool to the directory of your choice
- Once installed, start flashtool either by searching on the Start screen (or start menu) on Windows or open the directory where you installed flashtool and double-click the Flashtool.exe file. For e.g., if you installed flashtool on C drive on your computer, then open the directory “C:Flashtool”
Note: If you’re running a 64-bit windows installation then make sure you start the Flashtool64.exe file
The Rooting method for 10.3.1.A.0.244
There’s no one click root solution for .244 firmware version yet. But the workaround (which is a bit of process) would work well and is simple to understand. So what we’ll do to root the .244 firmware is:
- First flash the kernel from the previous firmware 10.3.A.0.423 using flashtool
- Then run the root exploit that worked for the .423 firmware
- And after that flash back the kernel of .244 firmware
And Voila! Root. Neat, isn’t it?
So let’s download the files that we’ll need for rooting your Xperia Z on 10.3.1.A.0.244 firmware.
Downloads
- Kernel from firmware 10.3.A.0.423
→ Download 10.3.1.A.0.423 kernel (7.12 MB)
File name: XperiaZ_C660X_KernelOnly_10.3.A.0.423_Generic_NL.ftf - Easy rooting toolkit v18 specifically written for rooting .244 firmware
→ Download Easy Rooting Toolkit (2.96 MB)
File name: DooMLoRD_Easy-Rooting-Toolkit_v18_perf-event-exploit.zip - Kernel for firmware 10.3.1.A.0.244
→ Download 10.3.1.A.0.244 kernel (7.17 MB)
File name: XperiaZ_C660X_KernelOnly_10.3.1.A.0.244_BE.ftf
Transfer .ftf files to Flashtool
Transfer the .ftf kernel files of .423 and .244 firmwares you downloaded from the section above to Firmwares folder inside the Flashtool installation folder.
- Say for example you installed Flashtool to C: drive on your computer
- Then your Flashtool installation folder would be “C:Flashtool”
- And the location of firmwares folder would be “C:Flashtoolfirmwares”
└ You’ve to transfer the .ftf kernel files to this folder
Instructions
Part 1 – Flash the 10.3.A.0.423 firmware’s kernel
- Open Flashtool
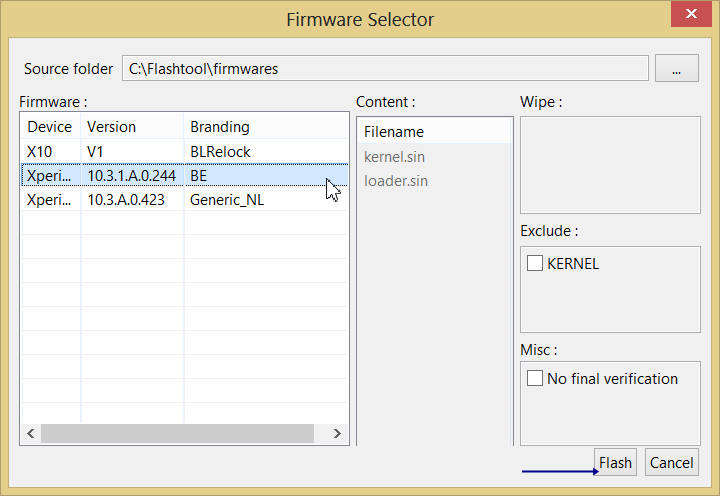
- Click the Flash icon (the first in row). Then select Flashmode from the pop-up window and click Ok
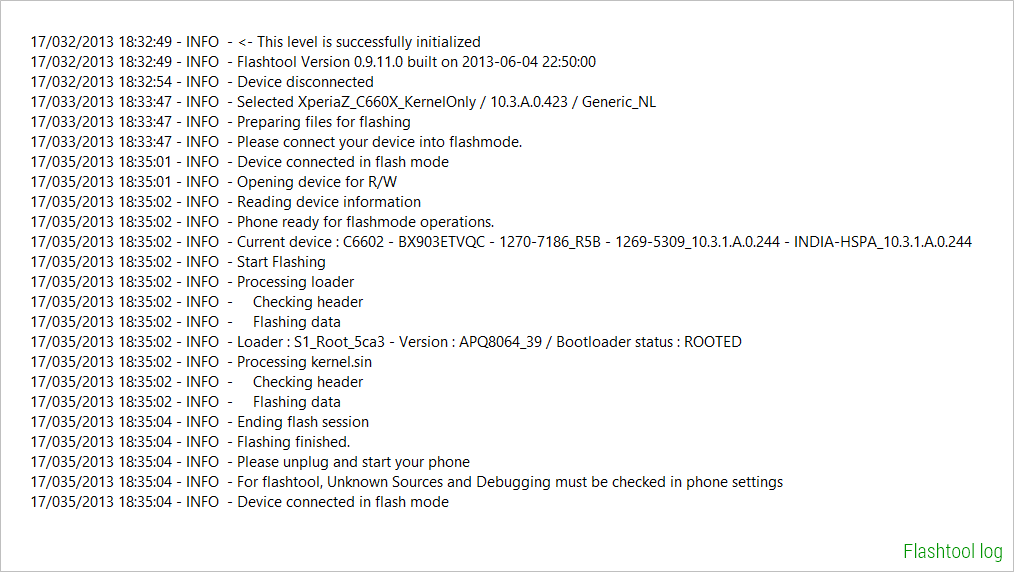
- Select the 10.3.A.0.423 kernel file from the list of files shown in the Firmwares section on the Firmware Selector window and then click “Flash”
Note: If you are not seeing any files listed in the firmwares selector window, then it means you haven’t transfer the .ftf kernel files to the firmwares folder inside the Flashtool installation folder. For help, jump back to → Tansfer .ftf files to Flashtool - Now connect your phone in Flashmode
- Switch off your phone
- Hold the Volume Down key and while holding it connect your phone to PC with an USB cable
- This should get you into Flashmode. If not, try again.
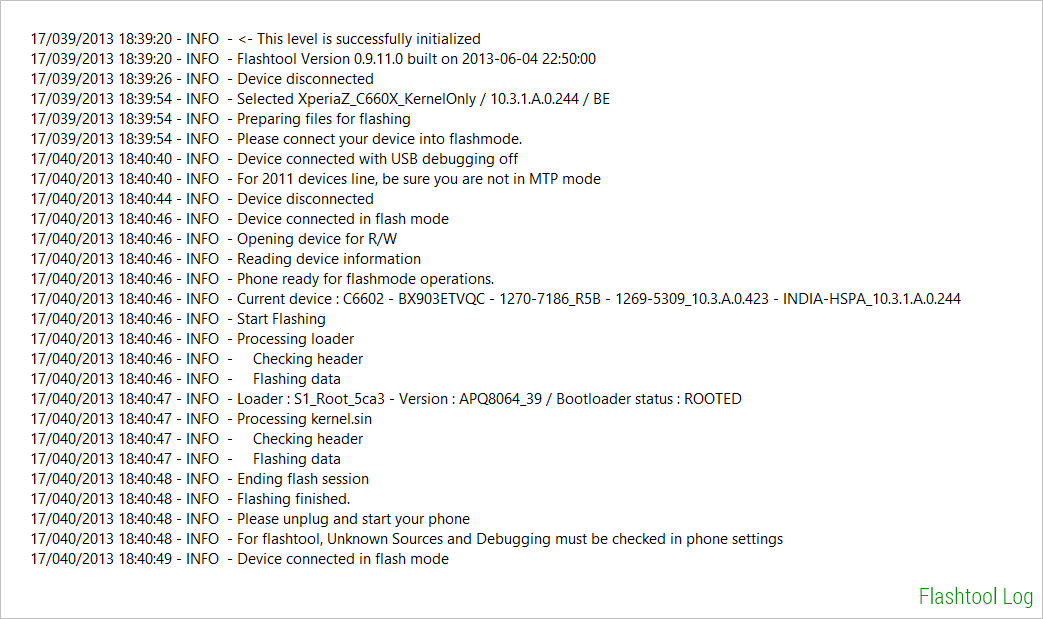
- Once you get into Flashmode, Flashtool will start flashing the 10.3.A.0.423 kernel file instantly. It should get done within a few seconds
- Disconnect your phone from computer once flashtool finishes the flashing process and prompts you to disconnect your device. Your phone will automatically reboot after getting disconnected
- Close Flashtool on your computer

Part 2 – Run Easy Rooting Toolkit by DoomLord
Important note! Before starting with Toolkit make sure you’ve closed Flashtool window otherwise the Toolkit won’t be able to function properly.
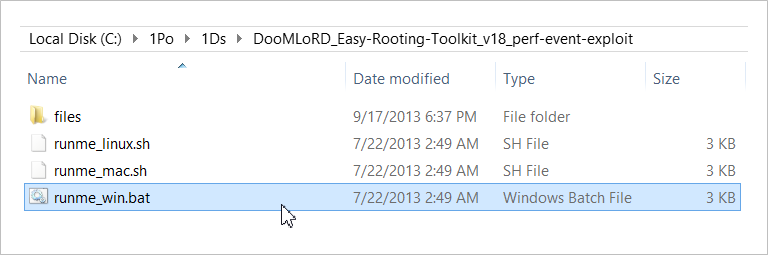
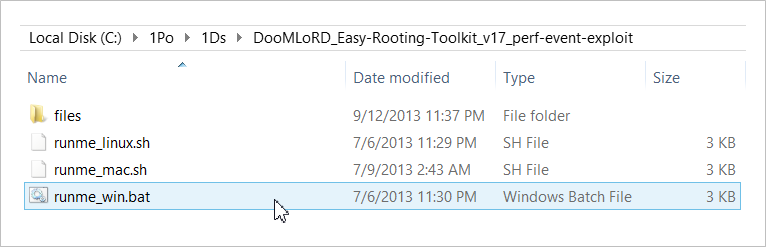
- Unzip/extract the “DooMLoRD_Easy-Rooting-Toolkit_v18_perf-event-exploit.zip” file (that you downloaded from the downloads section above) to a separate folder on your computer
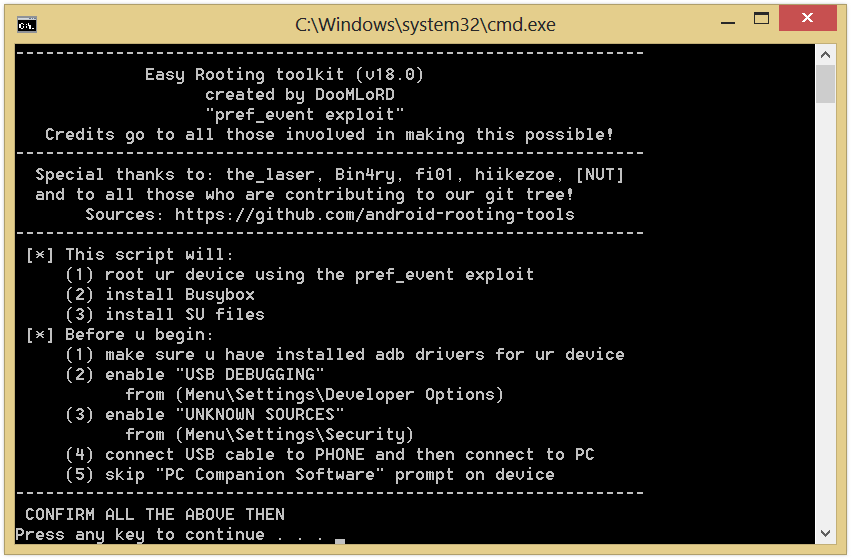
- From the files extracted in step above, execute the “runme_win.bat” file to start the Easy Rooting Toolkit
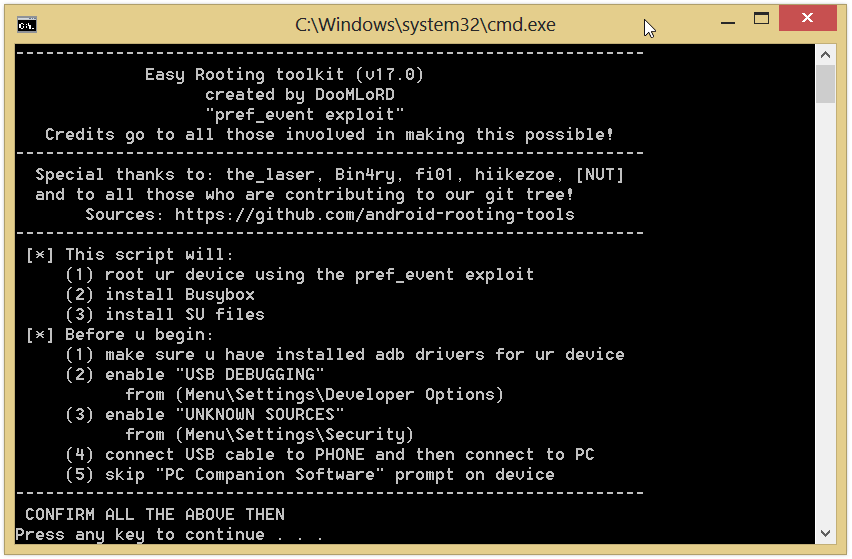
Easy Rooting Toolkit window
- Now prepare your phone
- Enable developer options: Go to your phone’s Settings » select About phone » Scroll to the bottom and tap on “Build number” seven times to enable developer options
- Enable USB Debugging: Open phone’s Settings » select Developer options » Tick the “USB debugging” checkbox (under Debugging section)
- Enable installation of apps from Unknown Sources: Open phone’s Settings » select Security » Tick the “Unknown sources” checkbox (under Device administration section)
- Connect your phone to PC with a USB cable and if a pop-up screen shows up on Phone asking you to Allow USB debugging for the computer, make sure you tick the checkbox and tap Okay
- Now on the Toolkit screen. Press any key to continue..
- Once toolkit finishes its job it’ll prompt the “Press any key to continue..” message again. So just press any key and toolkit will close automatically
- Disconnect your phone from your Computer

Your phone should be rooted now, check for SuperSU app in the app drawer. But the process isn’t complete yet since you’re running kernel from the previous firmware (10.3.A.0.423). So let’s flash the .244 firmware’s kernel back on your phone.
Part 3 – Flashing back the 10.3.1.A.0.244 firmware’s kernel
- Open Flashtool
- Click the Flash icon (the first in row). Then select Flashmode from the pop-up window and click Ok
- Select the 10.3.1.A.0.244 kernel file from the list of files shown in the Firmwares section on the Firmware Selector window and then click “Flash”
Note: If you are not seeing any files listed in the firmwares selector window, then it means you haven’t transfer the .ftf kernel files to the firmwares folder inside the Flashtool installation folder. For help, jump back to → Tansfer .ftf files to Flashtool - Now connect your phone in Flashmode
- Switch off your phone
- Hold the Volume Down key and while holding it connect your phone to PC with an USB cable
- This should get you into Flashmode. If not, try again.
- Once you get into Flashmode, Flashtool will start flashing the 10.3.1.A.0.244 kernel file instantly. It should get done within a few seconds
- Disconnect your phone from computer once flashtool finishes the flashing process and prompts you to disconnect your device. Your phone will automatically reboot after getting disconnected
- Close Flashtool on your computer
That’s it. Done!
Verify root!
Your phone is now back on .244 kernel and is rooted. To verify, you can try this app from the play store → Root Checker.
Rooting Xperia Z on older firmwares
The latest firmware released by Sony for Xperia Z is 10.3.1.A.0.244 and rooting method for it is discussed above. However, if you’re running an older firmware version on your, then rooting it will be a bit different and heck lot easier than .244 firmware.
Root Xperia Z on 10.3.A.0.423 and older firmwares
This should work for most of the firmwares released before (and including) 10.3.A.0.423 firmware. And it’ll be an easier one click process using Easy Root Toolkit.
→ Download Easy Root Toolkit v17 (2.92 MB)
File name: DooMLoRD_Easy-Rooting-Toolkit_v17_perf-event-exploit.zip
Instructions
- Unzip/extract the “DooMLoRD_Easy-Rooting-Toolkit_v17_perf-event-exploit.zip” file (that we downloaded above) to a separate folder on your computer
- From the files extracted in step above, execute the “runme_win.bat” file to start the Easy Rooting Toolkit
Easy Rooting Toolkit window
- Now prepare your phone
- Enable developer options: Go to your phone’s Settings » select About phone » Scroll to the bottom and tap on “Build number” seven times to enable developer options
- Enable USB Debugging: Open phone’s Settings » select Developer options » Tick the “USB debugging” checkbox (under Debugging section)
- Enable installation of apps from Unknown Sources: Open phone’s Settings » select Security » Tick the “Unknown sources” checkbox (under Device administration section)
- Connect your phone to PC with a USB cable and if a pop-up screen shows up on Phone asking you to Allow USB debugging for the computer, make sure you tick the checkbox and tap Okay
- Now on the Toolkit screen. Press any key to continue..
- Once toolkit finishes its job it’ll prompt the “Press any key to continue..” message again. So just press any key and toolkit will close automatically
- Disconnect your phone from your Computer
Your phone should be rooted now, check for SuperSU app in the app drawer.
Need help?
In case you need any help with the guide above be sure to let us know in the comments section below. We’d be happy help.


