Update: TWRP v3.0 was released by the TWRP team yesterday and now it is also available for the Galaxy S6 Edge users, especially those based on GSM network. So, European and T-Mobile Galaxy S6 Edge both have TWRP 3.0.0-0 available, while under CDMA network-serving S6 Edge sets, only US Cellular has got one TWRP 3.0.0.0 build.
The new TWRP 3.0 gets you new design that is seriously cool, and some extra features. First up, you get a good and handy terminal emulator. The 6.0 code serves as base for TWRP 3.0, which means support for Marshmallow-particular features is great. For example, you could now decrypt an SDcard formatted as internal storage on Marshmallow directly from TWRP 3.0. That’s not useful to S6 Edge as it lacks SDcard slot, but still deserves mention. Find here the full TWRP 3.0 changelog.
Original post: Ever since Samsung updated the Galaxy S6 Edge to Android 5.1, the support with TWRP recovery broke. Well, that meant developer community had to work their socks off to fix that, and you what happens when our favorite devs are up to something — they accomplish it in a matter of days. No surprise, a working TWRP recovery for Galaxy S6 Edge on Android 5.1 update G925FXXU2BOFJ is available for your flashing needs and desires. In case you were wondering, it works well on Android 5.0 too, meaning on any Galaxy S6 Edge with any firmware version! Our thank goes for the Android 5.1 TWRP recovery for S6 Edge goes to Alex-V, great work!
You don’t need to prepare much for this, just follow the guide below and you will have TWRP recovery in like 5 mins. This TWRP recovery works pretty well, and there is no bug really. Go ahead and install the Android 5.1 TWRP recovery on your Galaxy S6 Edge now, and btw, both international versions G925i and G925F are said to be fully supported. And btw, you can install the official Samsung Galaxy S6 Edge Android 5.1 update on G925i.
How to Install TWRP recovery on Galaxy S6 Edge G925i Android 5.0/5.1 update
Downloads
- TWRP Recovery
- Europe S6 Edge (model no. G925F, G925i, G925C) — TWRP 3.0 | TWRP 2.8.7.0
- T-Mobile S6 Edge (model no. G925T) — TWRP 3.0 | TWRP 2.8.7.0
- US Cellular S6 Edge (model no. G925R4) — TWRP 3.0 | TWRP 2.8.7.0
- Custom kernel:
- Odin PC software | File: Odin3_v3.10.6.zip (1.6 MB)
→ Note: Make sure you install a custom kernel too along with TWRP recovery for the device to boot up, as said in the guide below too. The kernel given above is compatible only with Android 5.1.1, don’t try that kernel on Marshmallow.
Supported devices
- SAMSUNG GALAXY S6 EDGE, model no. G925F, G925i, G925T and G925R4
- Don’t try this on Galaxy S6 whose model no. begins with SM-G920!
- Don’t try on any other device whatsoever!
Instructions
Warning: Warranty may be void of your device if you follow the procedures given on this page. You only are responsible for your device. We won’t be liable if any damage occurs to your device and/or its components.
Backup necessary stuff. In case your device is wiped off while following the guide below, it’s good to have a backup of contacts, photos, videos and other files already saved on PC.
- Download the Odin software, custom kernel and TWRP recovery file from above.
- Install Galaxy S6 Edge drivers (method 1 there!) first of all. Double click the .exe file of drivers to begin installation. (Not required if you have already done this.)
- Important! Connect your S6 Edge to PC. Transfer the custom kernel file to phone. Then disconnect the phone.
- Disable Reactivation lock. This is very important! For this:
- Go to Settings > Lock screen and security > Find my mobile.
- Disable the Reactivation lock if it’s enabled, using the toggle button.
Tip: If you haven’t added a Samsung account on your device ever, you would find it disabled by default. But if you did add a Samsung account anytime, it would be enabled most probably, so take care to disable it. If you are unable to this on phone, you can use Samsung’s website for this, just sign-in, go to Find my mobile section, and then disable from there. If you still can’t do this, do ask me via comments section below.
- Boot Galaxy S6 Edge into download mode:
- Power off your S6 Edge. Wait 6-7 seconds after screen goes off.
- Press and hold the three buttons Volume Down + Power + Home together until you see warning screen.
- Press Volume Up to continue to download mode.
- Extract the Odin file. You should get this file, Odin3 v3.10.6.exe (other files could be hidden, hence not visible).
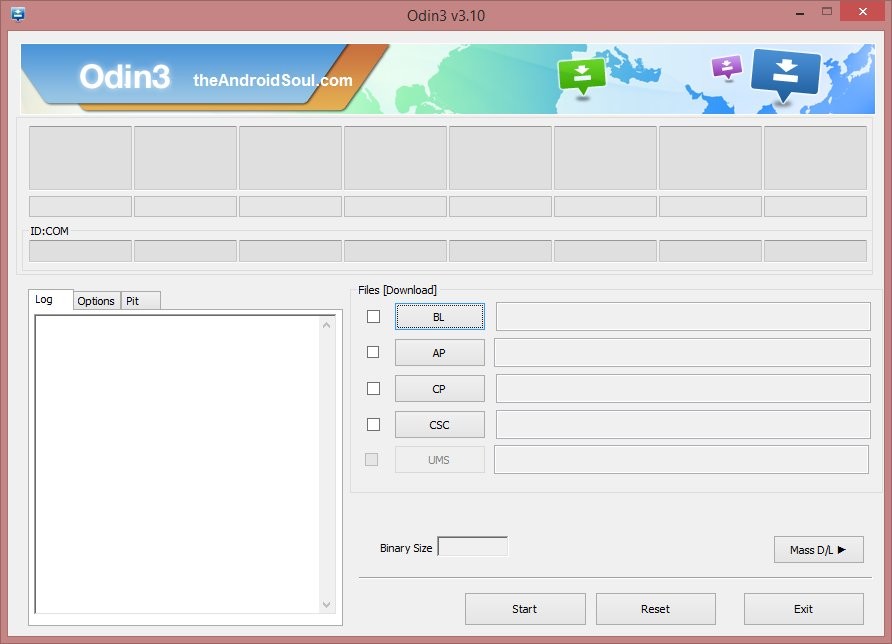
- Double click on extracted file of Odin, Odin3 v3.10.6.exe, to open the Odin window, as shown below. Be careful with Odin, and do just as said to prevent problems.
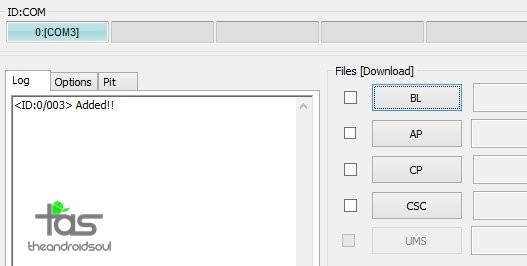
- Connect your Galaxy S6 Edge to PC now using USB cable. Odin should recognize your S6 Edge. It’s a must. When it recognizes, you will see Added!! message appearing in the Log box in bottom left, and the first box under ID:COM will also show a no. and turn its background blue. Look at the pic below.
- You cannot proceed until you get the Added!! message, which confirms that Odin has recognized your device.
- If you don’t get Added!! message, you need to install/re-install drivers again, and use the original cable that came with device. Mostly, drivers are the problem (look at step 2 above).
- You can try different USB ports on your PC too, btw.
- Load the TWRP file into Odin (that you got in step 4 above). Click the AP button on Odin and the select the file: twrp_5.1.1_edge.tar
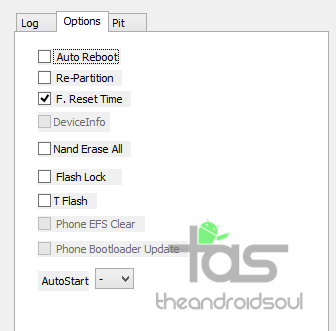
- Go to Options tab in Odin, and un-select the Auto Reboot checkbox. You should have bothAuto Reboot and Re-partition checkbox un-selected. Don’t use PIT tab. Go back to Log tab now, it will show the progress when you hit start button in next step.
- We’re set to install TWRP. But before we do that in next step, make sure you have transferred the custom kernel file (our step 3) to phone. because, once we install TWRP recovery, we cannot reboot the devic
- Click the Start button on Odin now to start flashing the TWRP recovery on your Galaxy S6 Edge. Wait till installation is finished, after which your S6 will NOT reboot automatically. You’ll get PASS message as show below upon successful installation from Odin.
- If Odin gets stuck at setup connection, then you need to do steps 5 to 11 again. For this, close Odin, disconnect your device, remove battery, insert it back after 5-6 seconds and then start from step 5 again.
- Or, if you get FAIL in the top left box, you need to try flashing again, as stated just above.
- Now, we have to boot the device into recovery mode. (At this stage, if you restart it, it would get stuck at Samsung’s logo!) Do this now:
- Press and hold Power + Home + Volume Down till screen goes off, and then, very quickly,slide your finger from Volume Down to Volume Up while still holding the other two buttons. Power + Home + Volume Up is the button combo to boot into recovery and you have to press and hold them when the device tries to reboot.
Tip: In case you fail at this, try again. When the device is trying to reboot, simply hold the Power + Home + Volume Down until you see screen going off, and then slide from Volume Down to Volume Up quickly while still holding other two buttons.
Alternate method: You can also try this. Do a Power + Home + Volume Down combo to boot into download mode and wait till you boot into Warning screen. Then press Volume Down key to get device to reboot, but right after pressing Volume Down, press and hold the Power + Home + Volume Up combo to reboot into recovery mode.
- Press and hold Power + Home + Volume Down till screen goes off, and then, very quickly,slide your finger from Volume Down to Volume Up while still holding the other two buttons. Power + Home + Volume Up is the button combo to boot into recovery and you have to press and hold them when the device tries to reboot.
- Once you are in TWRP recovery, we can root Android 5.1 update. On main screen of TWRP, tap on Install, and then browse and select the kernel file. On next screen, just do the Swipe action at the bottom to install the kernel.
- Tap on Reboot System to restart the device.
- That’s it. You have the TWRP recovery and the required custom kernel that works well with TWRP recovery.
- [Optional] Create a backup. Reboot into TWRP recovery and then tap on backup, and then select partitions of your choice, preferably all of them, and then do the Swipe action at bottom to start backing up the whole phone! It would always come very handy in case anything bad happens to phone. Go back to TWRP’s main screen by tapping on Home button at bottom left corner.
- To reboot into recovery mode when device is On, power off it first, and then press and hold Power + Home + Volume Up button together until you see Samsung logo.


That’s it. Let us know via comments below if you need any help with this!


cannot untick the reboot option….
its already ticked
Click on the box exactly. It shall untick. Otherwise, download the Odin provided above. It has it enabled.
done … thnxx
You’re welcome!
it worked..
cannot untick the reboot option….
its already ticked
Click on the box exactly. It shall untick. Otherwise, download the Odin provided above. It has it enabled.
cannot untick the reboot option….
its already ticked
Click on the box exactly. It shall untick. Otherwise, download the Odin provided above. It has it enabled.
done … thnxx
You’re welcome!
done … thnxx
You’re welcome!
it worked..
it worked..
i can’t turn no the reactivation protection, how do i deactivate that ?
i can’t turn no the reactivation protection, how do i deactivate that ?
i can’t turn no the reactivation protection, how do i deactivate that ?
Hi, I have my phone locked (thats why im trying to do this), so I cant do the step 3, there is a way to insert the kernel by odin?
Hi, I have my phone locked (thats why im trying to do this), so I cant do the step 3, there is a way to insert the kernel by odin?
I have rooted my samsung galaxy s6 edge G925F with the root of Unikernel v8-0002 through Odin and my mobile went wrong. When it gets restarted, It shows the red message at the left top of the screen ,”KERNEL IS NOT SEANDROID ENFORCING”. It simultaneously gets resteat aftar showing Samsung logo.
please, i need your help if you could please give the 4-files firmware of it in order to be flashed to be fresh.
This is my email: [email protected]
Yours sincerely
Sohail A. J.
Well, the root is confirmed to work good. And if you have G925F, then it shouldn’t be a problem at all.
Make sure you didn’t flash Galaxy S6’s file as you have to have edge’s (G925) file.
this root for s6 edge G925f may cause your device flaw and spoiled. And now i am really stuck in here!
It worked! Thank you so much for sharing. ^_^
It worked! Thank you so much for sharing. ^_^
Worked great. But how do I go back to the original recovery?
Worked great. But how do I go back to the original recovery?