Most of us use Gmail as our primary email service. So, to gain access to most of our sensitive information, a hacker is likely to launch an attack on Gmail first. Setting a virtually unhackable password is the first step towards immunity.
However, if that password gets compromised somehow, we must come up with a failsafe; one which would keep the hackers at bay. And that is exactly where Google’s two-step verification comes in.
RELATED: How to set up Google 2-step verification
Google’s Two-Step Verification asks you to verify your new Gmail login on your phone, even after entering the correct password. So, as long as you don’t lose your phone and password simultaneously, your account won’t be compromised.
This second step can be a simple Google prompt on your screen, a text message, a call, or even a security key. So, make sure you think long and hard before picking the most convenient option for you. In this piece, we’ll take an in-depth look at Google’s Two-Step Verification, and tell you how to make the most of the useful service.
- What is Google’s Advanced Protection Program and why do you need it
- How to get and use Google Advanced Protection program
Use Google Authenticator App
Google Authenticator is a free application that securely generates Two-Step Verification codes on your Android smartphone. No more waiting around for text messages to arrive, simply use the Authenticator app to complete signing in to Google or other supported accounts.
Even after setting Google Prompts/Call/Text/Secure key as your secondary login method, you can configure the Google Authenticator app as your backup.
Here’s how to set it up:
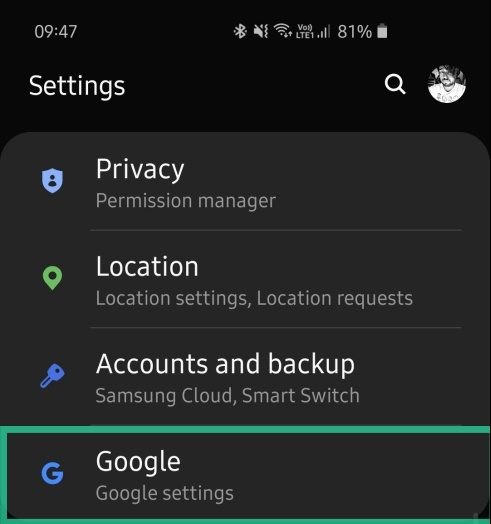
Step 1: Go to Settings and tap on Google.
Step 2: Tap on Manage your Google account.

Step 3: Go to Menu.

Step 4: Open Security.

Step 5: Tap on Two-Step Verification.

Step 6: Enter your password to access the 2-Step Verification menu.
Step 7: After scrolling down and locating Authenticator App, tap on Set Up.

Step 8: Select Android and tap Next.

Step 9: A barcode will be displayed. If you’re carrying out the entire process on your phone, tap on “Can’t Scan it?” to get a code.


Step 10: Download the app from the Google Play Store.

Step 11: Open the app and go to Scan a barcode. If you are setting this up on your phone, go to Enter a provided key.

Step 12: Enter your email-id alongside the key retrieved (step 9) from Google. Make sure Time-based is selected.
Step 13: Tap on Add.

Step 14: Copy the six-digit code displayed there.

Step 15: Go back to Google Settings, and tap on Next.

Step 16: Enter the six-digit code you copied and tap on Verify.

Step 17: Press Done to finish linking the Authenticator app to your Google account.

Your account would be added. As the codes change quite frequently (Time-based), no need to memorize the codes. Just head over to the add and copy the codes when needed.
Revoke Trusted Device
Losing a device that has access — your laptop for example — to all your login credentials is a nightmare. Not only is the perpetrator getting your valuable possession, but they can also access all your important emails and social media accounts.
Most of us use autofill to simplify the process of signing in. Google’s Two-Step Verification does require an additional step, but it only requires the password in case of trusted devices — devices, which have been used to log in successfully in the past. So, a trusted device with the auto sign-in turned on is a weapon of destruction in the wrong hands. Thankfully, Google has thought about this unfortunate scenario as well. In case your laptop gets stolen, you can head over to settings and revoke the permission for trusted devices.
Step 1: Go to Settings and tap on Google.
Step 2: Tap on Manage your Google account.
Step 3: Go to Menu.
Step 4: Tap on Security.
Step 5: Locate and tap on Two-Step Verification.
Step 6: Enter your password to access Two-Step Verification settings.
Step 7: Scroll down and tap on Revoke all under Devices you trust.

Change Phone Number
If Google Prompts or the Authenticator app isn’t your cup of tea, Google lets you go back to the good old days of text/call-based verification. Simply add the number of your choice, and Google will send a text or make a call with the verification code. Enter the code and the number will be linked with your Google account. If you’ve recently changed your number, you’ll have to link the new number with your Google account to continue enjoying the benefits of Two-Step Verification.
Step 1: Go to Settings and tap on Google.
Step 2: Tap on Manage your Google account.
Step 3: Go to Menu.
Step 4: Tap on Security.
Step 5: Locate and tap on Two-Step Verification.
Step 6: Tap on the little pencil icon (Edit) on the right side of your phone number.

Step 7: Tap on Change phone.

Step 8: Add the new number and tap on Next.

Step 9: Enter the verification code to complete the process.

Similarly, you could also delete your phone verification process by tapping on Delete phone.