
In a short span, OnePlus has emerged as one of the leading smartphone manufacturers in the world. The Chinese OEM makes exceptionally capable smartphones, blessing its devices with arguably the most bleeding-edge tech on the market. But adjudging OnePlus’ greatness only through its industry-leading internals would be nothing short of blasphemous.
The company takes great pride in its open and exceptionally helpful OnePlus community, which more often than not has a solution for all your hardware/software needs. The “issue” we’re dealing with today is cosmetic in nature but can feel quite frustrating to many users.
OnePlus 7 Pro users have been reporting the presence of an annoying black bar at the end of their keyboard. Not only does the keyboard eat a sizable chunk of screen real estate, but it also makes fast-typing a tad more difficult due to the realignment of keys.
Thankfully, a user over at XDA Developers has found a “solution” to this problem, fixing the issue by typing a simple command in ADB:
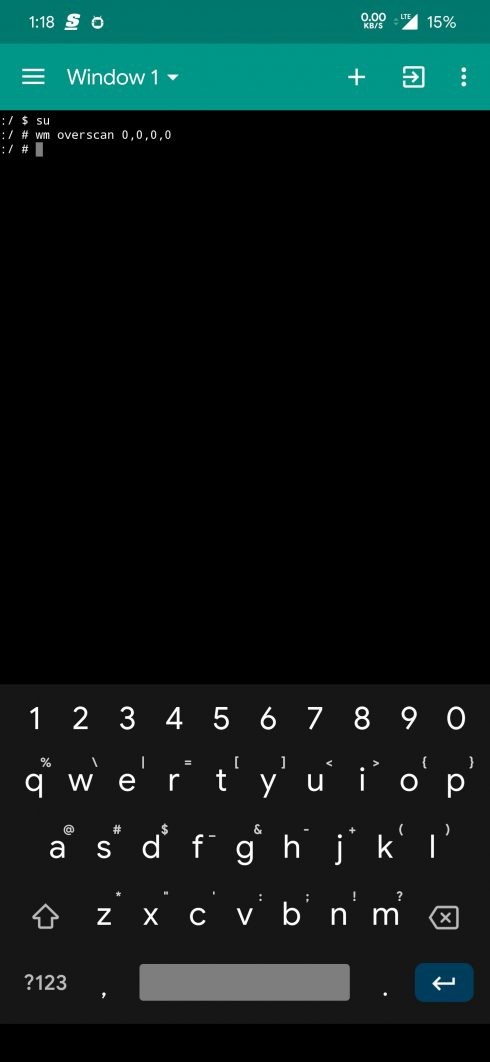
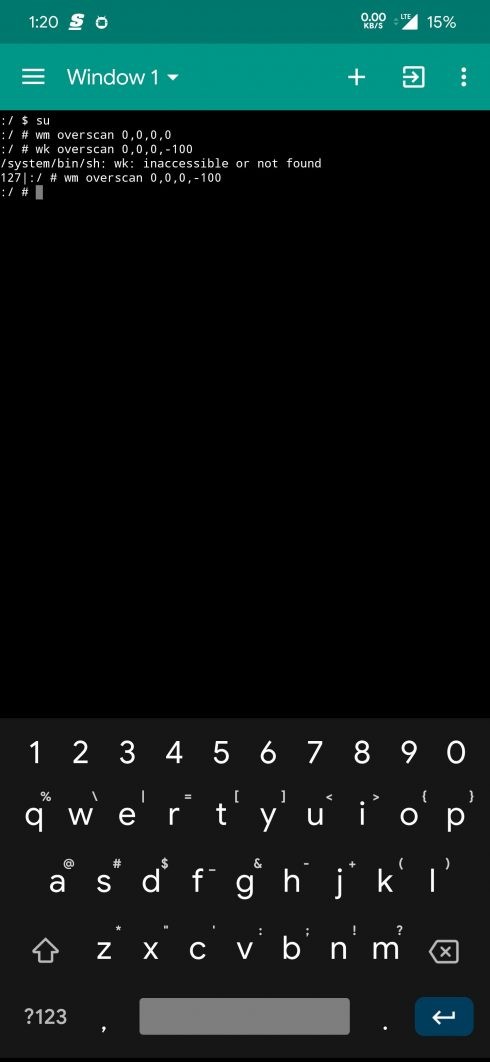
wm overscan 0,0,0,-100
The trick works for both rooted and non-rooted OnePlus 7 Pro users, but there’s a downside to this neat trick. As you are effectively decreasing the pill height, Toast messages, which appear at the bottom of the screen, also gets cut off. The messages are still readable but aren’t in their usual glory.
How to remove the empty space below the keyboard
If you are new to ADB, then here’s a step-by-step process to do this:
Step 1: Enable USB Debugging on your device.
Step 2: Install SDK Platform Tools. Download platform-tools for Windows from here.
Step 3: Extract the content of the Platform Tools’ zip file to a separate folder on your Windows PC. Let’s call this folder the ADB folder.
Step 4: Open a command window into the ADB folder. Open the ADB folder on your PC where you extracted the content of the Platform tools file. Type cmd in the address bar of the ADB folder and then hit the enter key. A command window will open up, and its location will be your ADB folder where you extracted the SDK tools and copied the update.zip file.
Step 5: Connect your device to your PC now. It’s recommended you use the original USB cable that came with the device. IF a pop-up shows up on the device regarding USB Debugging, tap OK to confirm.
Step 6: Run the following command now in the command window to remove the extra space below the keyboard:
wm overscan 0,0,0,-100
That’s all. BTW, you can change the value of -100 to something like -75 or -50, as it suits you.
When done, remove the cable from your phone and check out if the problem is gone now.
How to revert back the changes?
Well, simply run this command to go back to normal:
wm overscan 0,0,0,0
Let us know if you need any help regarding this.