Zoom has lately been on the rise and is widely used among organizations, educational institutions, and casual users to communicate with their community. The service has a slew of functionalities, one of which is the ability to record ongoing meetings.
If you’re a host or a participant of a meeting where recording is enabled, you can record meetings on Zoom directly from the desktop app. The ‘Record’ option is present inside the meeting screen on the right side of ‘Chat’ and both participants and hosts will have the functionality depending upon the meeting settings.
However, Zoom restricts the recording of meetings that have been disabled by the host. If you’re a participant of a meeting that cannot be recorded, you can still be able to record the session with audio by following the guide below.
Know this!
Kindly note that Zoom has a recording option of its own to let you record any meeting you want.
But, if the host of the meeting has disabled it, or has not enabled it in the first place, or has forbidden anyone from recording a meeting, there this page has workaround guides for these scenarios.
So, are not a host but a participant of a meeting, and the recording feature is not enabled for you, then you can use the tricks given below to record a meeting by using a screen recorder software on your PC.
We have covered separate guides for Zoom meetings held on Zoom Web (on browser app) and Zoom Desktop client (PC app).
So, briefly put, if the recording is enabled by host for you, you can simply click the Record button in your Zoom meeting interface (step-by-step guide) to record a meeting and won’t need the detailed setups given below. On the other hand, if the recording option is not available for you, you can use the tricks given below for Web and Desktop clients to force record a meeting.
Recover Zoom meeting without permission on Web
If you want to record a Zoom meeting on the web without downloading a desktop software, you can use Apowersoft’s Free Online Screen Recorder tool to do so. We’re using this tool as it doesn’t take a toll on your processes as it runs over the web and doesn’t need you to sign in to use the service.
Step 1: Open the Apowersoft Free Online Screen Recorder page on your web browser.
Step 2: When the page loads up, click on ‘Start recording’ and then ‘Download Launcher’.


Clicking this will prompt you that an online launcher needs to be installed on your PC to enable the Screen Recorder to work.
Step 3: Download and install the launcher app on your PC by opening the file and installing it as per the instructions on the screen.

Step 4: Now on the Apowersoft Free Online Screen Recorder page, click on ‘Start recording’ again. This will open the screen recorder on the screen.
Step 5: Open the Zoom app and join a meeting.
Step 6: Now select the particular window that the recorder needs to record. To do that, click on the Frame icon on the recorder toolbar and select the Zoom meeting screen to choose the recording area. You can manually drag the edges of the recorder to select your own recording screen.


Step 7 (Optional): You can modify other recording settings like video and audio quality, frame rate, bitrate, video format, keyboard shortcuts, mouse styles, and more. You can do so by clicking the 3-dot icon on the recorder toolbar and selecting Settings.

You will then get the General and Recording tabs to configure the recorder the way you want.


Step 8: Check if the audio source is set to ‘System sound and microphone’ after clicking the microphone icon on the toolbar.

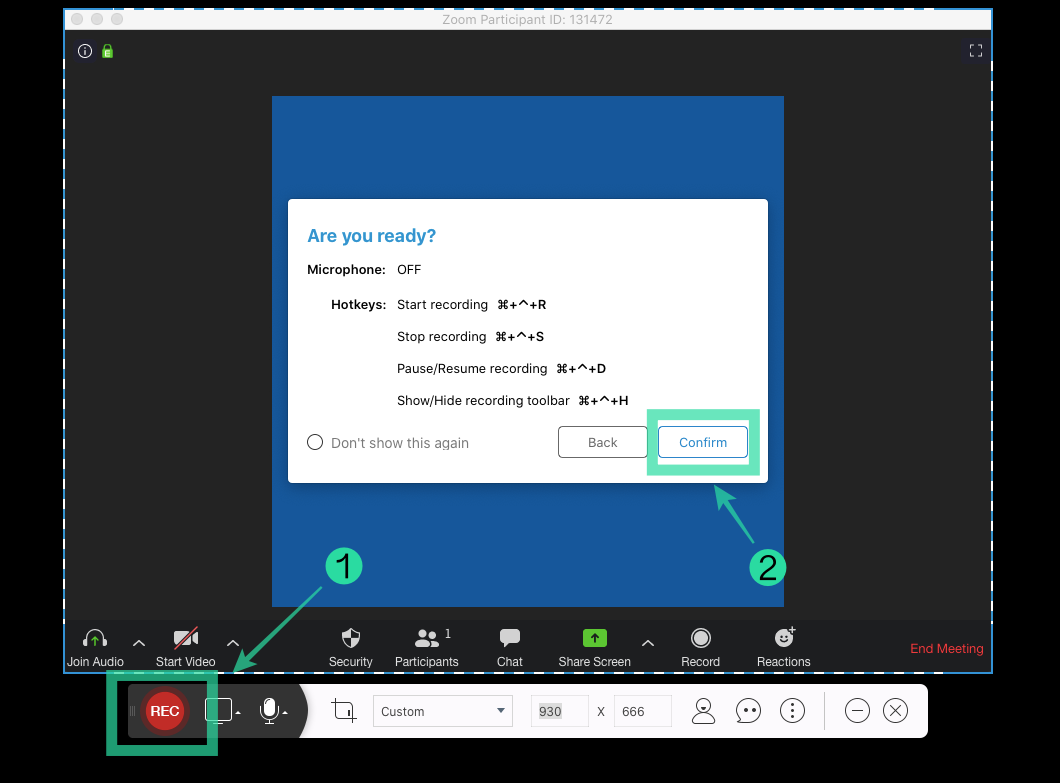
Step 9: Click the red ‘REC’ button on the recorder toolbar to start recording and press ‘Confirm’ when prompted for confirmation. This will start recording your meeting session.
Step 10: Once the meeting is done, you can stop the recording by clicking the Stop button. You can then save the recording as a video file or GIF and directly share to Youtube, Vimeo, Google Drive, or Dropbox.

That’s it! If you wish to record another meeting session, all you need to do is open the Apowersoft Free Online Screen Recorder page and hit ‘Start Recording’ to hit the ground running. This will directly pop up the screen recorder without it needing to be installed all over again.
Recover Zoom meeting without permission on the desktop client
If you wish to use third-party screen recorder software on your Desktop to record a Zoom meeting without permission, you can follow the guide below to do so.
For the following guide, we’re using ApowerREC on Mac and Windows to record a Zoom meeting which is available for free. If you’re willing to spend a little extra, you can install Bandicam and Camtasia to record meetings without any restrictions.
Step 1: Download and install the ApowerREC app on your Windows / Mac computer. Give it the necessary permissions like access to the contents of your screen and the microphone.
Step 2: Open the Zoom app and join a meeting.
Step 3: Open ApowerREC on your PC.
Step 4: Select the Zoom meeting window on ApowerREC so that the latter is able to map the screen area of the meeting. You can do so by clicking the Custom tile on the recorder and dragging the cursor from one corner to the other of the meeting window. Leave some extra space so that no part of the meeting window gets cropped out.


Step 5: ApowerREC further allows you to modify other recording settings like video and audio quality, frame rate, bitrate, video format, keyboard shortcuts, mouse styles, output folder, Autostop, and more. You can do so by clicking the More icon at the top right corner, selecting ‘Settings’ and making the necessary changes inside the Settings window.


Step 6: To record your sound as well as the sound of other participants, you will have to select the ‘System sound and microphone’ option after clicking the Speaker icon on the recorder window.


Step 7 (Optional): You can set the ApowerREC app to stop the recording automatically after a certain period. This can be helpful in the case of Zoom free accounts as the maximum time allowed in one meeting session is 40 minutes.
To enable Auto stop, click on the Auto-Stop option on the recorder window, check the box adjacent to ‘Enable Auto Stop’, set a time limit or file size after which the recording will stop automatically and then click ‘Ok’.


Now you’re all set to start the recording.
Step 8: Start the recording by clicking the red ‘REC’ button on the window. When the recording starts, a floating toolbar will appear on the screen showing the time with options to pause/resume, take screenshots, Zoom and annotate on the recording window.


Step 9: Click on the red button on the floating toolbar to end a recording session.

Once you end a recording, a list of all your recordings will be shown on the ApowerREC app where you will be able to upload it to YouTube, FTP and other platforms, delete or locate them on your PC.
Alternative Zoom recording software
- For a Zoom meeting on the web, you can use the Chrome extensions like Loom and BombBomb
- For a Zoom meeting on Desktop client, you can use paid options like Bandicam and Camtasia to record meetings without any restrictions.
Recording Zoom meeting on Phone
Similar to the desktop screen recorder software above, you can use the screen recorder apps on your phone too to record a Zoom meeting without permission. Here’s our list of best apps to record screen on Android:
► Best screen recorder apps for Android
► For iOS devices, you can use the Record it! app
Do you want to record all your Zoom meetings without relying on Zoom’s own screen recorder? What do you use to record meetings on Zoom that you don’t have the permission to record? Let us know in the comments below.


It doesnt mentions if we can recore Audio if we are using headphone and mic
doesnt work, waste of time!
You conveniently forgot to mention that you can only record video in 2 minute chunks using ApowerREC without buying the premium version! I ended up using Windows 10 Game Bar. Thats totally free and built into Windows 10. Shortcut to record: Window + Alt + R.
You life-saver!
The absolute easiest way (and it’s FREE) is to use Zoomcorder.com.
Just enter the meeting URL and the meeting is recorded and sent to you.
Super easy. You get video, audio and the chat session.
Use the “video avatar” feature so others in the meeting see a realistic video of you and think you’re in attendance (but it’s really the Zoomcorder.com bot).
Very nice to know, but Zoomcorder is NOT FREE. It’s a paid service.