Update (July 28, 2015): Well, this post is being updated with the latest version of TWRP recovery, which solves many, many things and provide answer to many, many things. Ok, not that many things, but still, be sure to install TWRP v2.8.7.0 linked below. And, even more important! once you install the TWRP recovery, don’t mount the system as read-write. Keep it as read-only. From TWRP v2.8.7.0 and higher, TWRP doesn’t mount system as read-write if it detects that it was never mounted. It gives you opportunity to take a backup of system, so, grab it with both hands. Create a backup now! And then go on and mount system as read-write, and then whatever you wanted to, including flashing SuperSU file to gain root access. But be sure to create backup before mounting system as read-write.
If you have understood what’s said in this paragraph, then only go ahead to TWRP recovery installation and take care to create backup before mounting the system as read-write or installing any zip file.
DOWNLOADS
- TWRP Recovery v2.8.7.0 — Link | File: Download twrp-2.8.7.x-hima.img
INSTALLATION INSTRUCTIONS
WARNING: Warranty may be void of your device if you follow the procedures given on this page. You only are responsible for your device. We won’t be liable if any damage occurs to your device and/or its components.
Important Note: Backup important files (music, photos, documents, videos, etc.) stored on your HTC One M9 before proceeding with the steps below. TWRP recovery can only be installed if you’ve an unlocked bootloader on your HTC One M9, and unlocking bootloader completely wipes the storage on a device. So make sure you backup any/all of your important files on a PC.
- Make sure your device is HTC One M9, do not try this on any other device!
- Install ADB and Fastboot driver, if not installed already.
- Also install HTC One M9 drivers, if not installed already.
- Unlock the bootloader on your HTC One M9.
- On One M9, enable USB debugging. For this:
- Go to Settings > About phone, and then tap ‘Build number’ 7 times to unlock developer options.
- Go back to Settings, then choose ‘Developer options’. Find the ‘USB debugging’ option and use its toggle button to enable it. Accept warning by tapping on OK button.
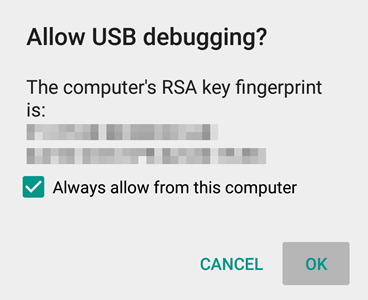
- Connect your One M9 to PC now. You will get a pop-up as shown below on your phone when you connect for the first time after enabling USB debugging. Select ‘Always allow from this computer’ checkbox and then tap on OK button.
- Download the HTC One M9 TWRP recovery file. Version must be 2.8.7.0 or higher. Don’t go for v2.8.6.x!
- Rename the recovery file to a simple one, one-m9-twrp.img
- Now, open command window in the folder where you have the one-m9-twrp.img file. For this:
- Left click on empty white space in the folder.
- Now, while holding shift key, right click on empty white space to get a pop-up as shown below.
- Now choose Open command window here option from that.
You will see a command window open up, with location directed to folder where you have the twrp recovery file.
- Disconnect it from PC, and then boot your HTC One M9 into Download mode:
- Power off your device. Wait for 5-10 seconds after screen goes off.
- Press and hold Power and Volume down together until phone vibrates a little. You will reach download/fastboot mode. It should be black screen, not white.
- Connect your One M9 to PC now. Test whether fastboot is working alright. In the command window, type the following and then hit enter key. (You can also copy paste the commands.)
→ Upon this, you should get a serial no. with fastboot written after it. If you don’t get fastboot written on cmd window, then it means you need to reinstall adb and fastboot drivers, or change restart PC, or use original USB cable.fastboot devices
- Flash One M9 TWRP recovery v2.8.7.0 (or higher) now. Use the following command for that.
fastboot flash recovery one-m9-twrp.img
- TWRP recovery will now be installed on your HTC One M9. Let’s check out the new recovery now, and take the stock system partition backup. So, reboot your One M9 to Recovery mode:
- While in download mode, select the option ‘reboot to bootlaoder’.
- When in bootloader mode, select the option ‘boot to recovery mode’. That’s it, you shall see TWRP recovery soon.
- If this is your first installation of TWRP recovery, then TWRP won’t mount the system as read-write. It will provide you info on that. Create a backup of this untouched stock partition now. Even if you fail to do so, we have guide written for you on how to get untouched system back. (Search for Back to Stock T-Mobile HTC One M9 on this site.) But for now, just take a backup and keep it safe on PC.
- In TWRP, tap on Backup, and then select all partitions. Then do the swipe action at bottom to start the backup process.

Happy flashing!