After a really, really long wait, the TWRP recovery for the Essential Phone is now available. So if you were looking to root your Essential phone, this is now an easy job because all you need to do now is install magisk root package using TWRP.
Although, installing the TWRP recovery isn’t the easiest of processes by any means, but there is a convenient guide available from the developer himself that should guide you through the installation of TWRP recovery.
Of course, all of this fun begins with unlocking the bootloader of the device. Without that, you cannot install TWRP as fastboot mode remains locked by default.
Credit for the TWRP recovery for Essential phone goes to well-known developer Ethan Yonker, also known by XDA moniker Dees_Troy.
Warning!
Do not try anything given on this page if you do not know completely what you are doing. In case any damage occurs, we won’t be held responsible.
Compatibility
The downloads and the guide given here are compatible only with the Essential Phone. Do not try this on any other device as you may end up bricking it.
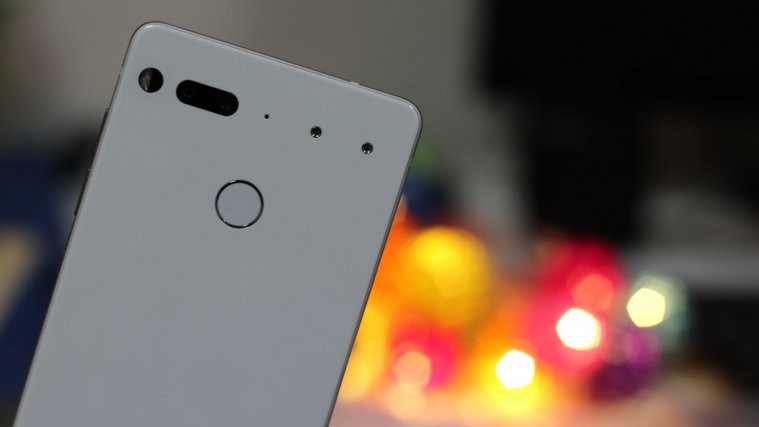
Essential Phone TWRP Recovery
Grab the required files for TWRP recovery from below:
→ Latest TWRP files can be downloaded from here.
To install TWRP, see the root guide below. As installing TWRP is what you do first in order to root the device, we have merged the TWRP and root guides into one guide. If you don’t want to root the device though, then be sure to install the lazyflasher file in place of Magisk root package.
Related articles:
Essential Phone Root
Here’s an easy step-by-step guide to help you install TWRP recovery on your Essential Phone. You can use the TWRP recovery to easily gain root access on the device.
- Make sure that you’ve unlocked the bootloader for the Essential Phone before proceeding. Take your time doing this.
- Download the required files:
- TWRP recovery: twrp-3.2.3.0-beryllium-20180831.img
- Root package: Magisk v18.0
- Lazyflasher: Link
- Connect your Essential Phone to PC using the USB cable that came with it.
- Transfer the TWRP ZIP, Lazyflasher, and Magisk file to your Essential Phone. Keep TWRP IMG file on the PC. And keep the Essential Phone connected to PC.
- Make sure you have enabled USB Debugging on your Essential Phone, as explained in the bootloader unlock post above (step 1). You may need to re-do it after unlocking the bootloader.
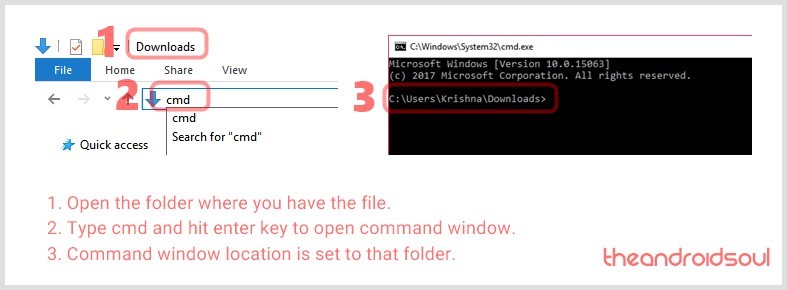
- Now open a command window inside the folder where you have the TWRP file from above. For this, go that folder, and then type cmd in the address bar of that folder’s window, and then hit the enter key. A command window will open up, and its location will be that folder.
- Find the active partition of your device (it has two, A and B). For this, with the device connected to PC, run the following command:
adb shell getprop ro.boot.slot_suffix
- Notice the letter at the end of the result. It would be either of _a and _b. If it’s _a, then your active partition is A, and if it’s _b, then it’s B. Take note of it because we will need to change the active partition below and use the appropriate letter in the commands below.
- Boot your Essential Phone into bootloader/fastboot mode. For this run this command:
adb reboot bootloader
└ If you get a permission dialogue on your device to “Allow USB debugging”, tap OK.
- Change the active partition. If your device is using the A partition, then you need to set the B partition as active using the command below, and vice versa.
- Set active partition from A to B: fastboot –set-active=_b
- Set active partition from B to A: fastboot –set-active=_a
The command window will show you the test ‘setting current slot to …’. Which means changing the active partition was successful.
- Install TWRP recovery on your device by running the command below. To run a command, simply type this in the command window and then hit the enter key.
fastboot flash boot <name of the TWRP file>.img
- Now, reboot the device into recovery mode to access TWRP by running the command below.
fastboot reboot
- Enter the password to let TWRP pass through the security and decrypt the phone.
- You will see TWRP recovery now. When asked to ‘Keep System Read only?’, tap on the ‘Keep Read Only’ button to not allow for system modifications.
- Change the active partition again from within TWRP. From TWRP’s home screen, tap on Reboot button, and then choose the originally active partition (that you got in step 7 above).
- [Optional] Take backup. From the home screen, tap on backup, select the partitions and then confirm by swiping at the bottom of the phone’s screen.
- Install TWRP recovery permanently. From the home screen, tap on the Install button, and then select the TWRP ZIP file and confirm it on the next screen.
- Now that you have the TWRP recovery on both the partitions, you are good to go. You can root the Essential Phone now. For this, install the Magisk root package. Go back to the home screen of TWRP and tap on Install, select the ZIP file, and confirm on the next screen.
- If you don’t want to root the device, then install the lazyflasher file in place of Magisk file above. You need to install either of the lazyflasher and Magisk to prevent the device from bootlooping.
- Restart the device: tap on Reboot > System. Enjoy the root access and TWRP on your Essential phone. You can verify root access on your Essential Phone using a root checker app.
That’s it

