ROOT PACKAGE INFO
| Name | CF Auto Root One Click Tool |
| Warranty | Voids Warranty. |
| Stability | Stable without any issues. |
| Root Manager App | SuperSU. It manages root permissions for apps on the device. |
| Credits | Chainfire |
WARNING!
Warranty may be void of your device if you follow the procedures given on this page.
You only are responsible for your device. We won’t be liable if any damage occurs to your device and/or its components.
GUIDE: ROOT US CELLULAR SAMSUNG GALAXY NOTE 2 SCH-R950
Before you begin with the instructions below, make sure your android device is adequately charged — at least 50% battery of the device.
STEP 0: CHECK DEVICE MODEL NO.
To make sure your device is eligible with this, you must first confirm its model no. in ‘About device’ option under Settings. Another way to confirm model no. is by looking for it on the packaging box of your device. It must be SCH-R950!
Do not use the procedures discussed here on any other variants of Galaxy Note 2 (including the Galaxy Note 2 variant at AT&T, LTE, T-Mobile, Verizon, Sprint and other International variants) or any other device of Samsung or any other company. You have been warned!
STEP 1: BACKUP YOUR DEVICE
Back up important data and stuff before you start playing around here as there are chances you might lose your apps and app-data (app settings, game progress, etc.), and in rare case, files on the internal memory, too.
For help on Backup and Restore, check out our exclusive page on that linked right below.
► ANDROID BACK UP AND RESTORE GUIDE: APPS AND TIPS
STEP 2: INSTALL LATEST DRIVER
You must have proper and working driver installed on your windows computer to be able to successfully root your US Cellular Samsung Galaxy Note 2.
In case you’re not sure, follow the link below for a definitive guide for installing driver for your Samsung device on your computer.
► SAMSUNG DEVICES DRIVERS INSTALLATION GUIDE
STEP 3: INSTALLATION INSTRUCTIONS
DOWNLOADS
Download the CF Auto Root file given below and transfer it to a separate folder on your computer (just to keep things tidy, that is).
CF AUTO ROOT FILE
DOWNLOAD LINK | File name: CF-Auto-Root-t0lteusc-t0lteusc-schr950.zip (12.91 MB)
STEP-BY-STEP GUIDE
Example video: If you haven’t used Odin before to flash a file on your phone before, then we suggest you first watch a video of that to get familiar with the process. The video demonstrates flashing of a Recovery on Galaxy S3, but since the procedure is same, the video will help: Click here to watch the video
Important Note: Backup important files stored on internal SD card of your device, so that in case a situation arises requiring you to do a factory reset after flashing the CF Auto Root, which might delete internal sd card too, your files will remain safe on PC.
- Extract/Unzip the CF-Auto-Root file, CF-Auto-Root-t0lteusc-t0lteusc-schr950.zip on your computer (using 7-zip free software, preferably). You’ll get the following files:
- Odin3-v1.85.exe
- Odin3.ini
- CF-Auto-Root-t0lteusc-t0lteusc-schr950.tar.md5
- Disconnect the US Cellular Galaxy Note 2 from PC if it is connected.
- Double-click the Odin3-v1.85.exe file to open Odin.
- Boot your US Cellular Samsung Galaxy Note 2 into Download Mode:
- Power off your phone first and wait for 6-7 seconds after display is off.
- Press and hold these 3 buttons together until you see Warning! screen: Volume Down + Power + Home.
- Press Volume Up now to continue to Download Mode.

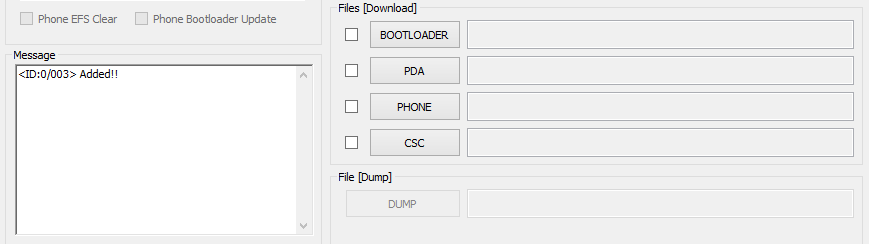
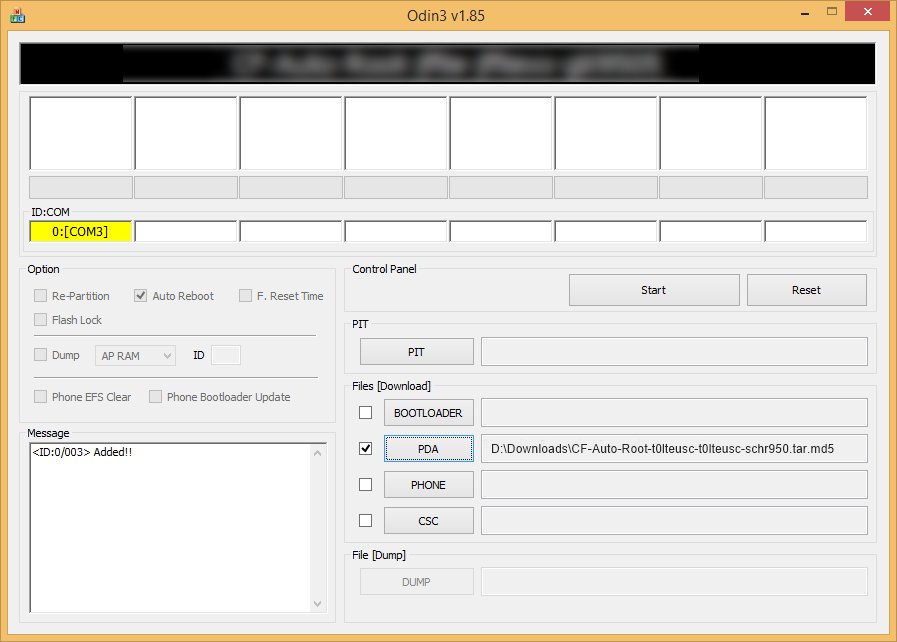
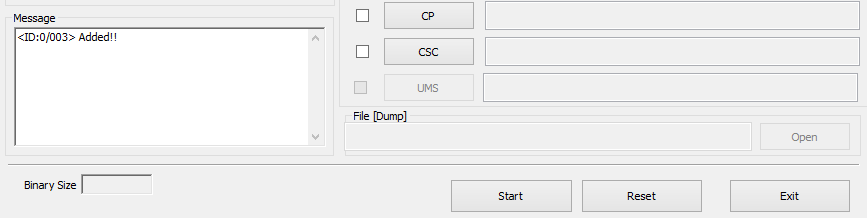
- Connect your US Cellular Galaxy Note 2 to PC. Odin window will show an Added!! message in bottom left box. Odin’s screen would look like this:
If you don’t get the Added! message, here are some troubleshooting tips:- Make sure you have installed driver for US Cellular Galaxy Note 2 as said above in ‘Before you begin..’ section.
- If you have already installed driver, then uninstall them and reinstall back.
- Connect using a different USB port on your PC.
- Try a different USB cable. The original cable that came with your phone should work best, if not, try any other cable that’s new and of good quality.
- Reboot your phone and PC and then try again.
- Load the firmware file (extracted in Step 1) into Odin as instructed below:
- Click on the PDA button on Odin and select the CF-Auto-Root-t0lteusc-t0lteusc-schr950.tar.md5 file (from step 1). Your Odin window should look like the screenshot below:
- Click on the PDA button on Odin and select the CF-Auto-Root-t0lteusc-t0lteusc-schr950.tar.md5 file (from step 1). Your Odin window should look like the screenshot below:
- Now in the Option section of Odin, make sure that Re-Partition box is unchecked. (Auto Reboot and F. Reset Time boxes remain checked, while all other boxes remain unchecked.)
- Double check the above two steps. (Step 6 and Step 7)
- Click the Start button to begin flashing, and wait until you see a PASS! message in Odin’s top left box.
- When you get PASS! message, your device will restart automatically. You can then disconnect your phone from PC.

If you see FAIL message instead of the PASS in Odin’s top left box, that’s a problem. Try this now: disconnect your US Cellular Galaxy Note 2 from PC, close Odin, remove phone’s battery and put it back inside in 3-4 seconds, open Odin and then repeat from Step 2 of this guide again.
Also, If device is Stuck at setup connection or on any other process, then too, try this: disconnect your US Cellular Galaxy Note 2 from PC, close Odin, remove phone’s battery and put it back inside in 3-4 seconds, open Odin and then repeat from Step 2 of this guide again.
NOTE: It may happen that your phone doesn’t automatically boot into recovery and root your phone. In that case follow the following above procedure except that in Step 7, Auto Reboot option is un-checked and then the instructions below:
- Pull out the battery and re-insert it.
- Boot your US Cellular Galaxy Note 2 into Recovery Mode: Press and hold these 3 buttons together: Volume Up + Power + Home.
- Now, this will start the rooting process and will reboot the phone automatically when the process is done.
That’s all. If you need help regarding this, feel free to ask us in comments below.
FEEDBACK US!
It was easy to root your US Cellular Galaxy Note 2 with CF Auto Root Tool, right? Let us know how you plan to use root privileges on your US Cellular Galaxy Note 2.
Your suggestions and queries, if any, are most welcomed!


Im not sure this worked properly, All steps completed correctly as listed but when I tried to start the tethering, it said phone must be rooted.
Im not sure this worked properly, All steps completed correctly as listed but when I tried to start the tethering, it said phone must be rooted.
Im not sure this worked properly, All steps completed correctly as listed but when I tried to start the tethering, it said phone must be rooted.