
If you are a Windows 10 user, you can upgrade to Windows 11 without paying a dime. However, even after such a lucrative offer, many are afraid to take the plunge, mainly due to the insane system requirements for Windows 11. Today, we will give you a workaround for this problem, tell you how you could bypass the system check before Windows 11 installation.
What happens when you have Unsupported Hardware?
As you must already know Windows 11 is not as generous as Windows 10, meaning your system has to be considerably beefy to run Windows 11 in all its glory. It is required to have TPM 2.0, Intel 8th generation or Ryzen 3000 CPU and above, an SSD, and more. Yes, the minimum system requirements have been dialed down since launch, but that does not mean you will be able to enjoy all Windows 11 features without an issue.
Even if your system fails to meet a single requirement, the installer will stop you from installing the Windows 11 OS, and there is no way for you to revert back to the previous stage.
Related: 18 Best Apps on Microsoft Store to Download [October 2021]
How to remove appraiserres.dll when installing Windows 11 using Setup to Bypass Requirements
To make sure no system check is performed, you must remove the file that instigates it all, aka “appraiserres.dll.” There are multiple ways of doing that, one of which includes an ISO, but doing so during setup is probably the easiest of the lot.
First, click on this link to go to Windows 11 ISO download page. Click on the ‘Download’ button to get the ISO file.

Once it is downloaded, double-click on it to mount it. The ISO file’s content will be opened in a new folder, else you can find it as it will be shown as a new drive in the “This PC” screren.
Run the Setup by double-clicking on it.

Next, click on the ‘Change how Setup downloads updates’ hyperlink.

On the next page, select ‘Not right now.’

However, do not click ‘Next’ to proceed with the installation. You have to open Windows Explorer and go to:
C:\$WINDOWS.~BT\Sources\

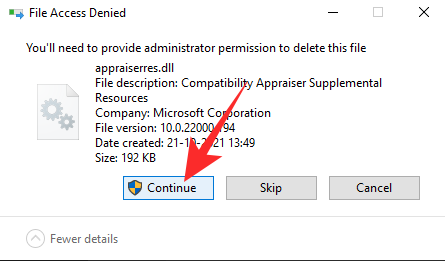
Now, scroll down and delete the appraiserres.dll file.

You will have to click on ‘Continue’ in order to go through with the deletion.
Now, return to the installer and click on ‘Next.’

The installer will skip the verification and take you straight to licensing and validation. Click on ‘Accept’ to begin.’

Follow the on-screen prompts to finish installing Windows 11.
In our experience, deleting the DLL file during setup requires the least effort, so, be sure to give this method a try if you have unsupported hardware.
RELATED
- How to Block Windows 11 Update Using GPO
- 3 Latest Ways to Bypass Windows 11 Requirements (With or Without Registry Hack)
- What Is Windows 11 Registry Bypass? How to Use It to Install Windows 11 on Unsupported Hardware
- How to Get Classic Shell on Windows 11 Via Open Shell
- Windows 11 Sideload APK [Guide]
- How to Force Install Windows Subsystem for Android YourSelf Using Msixbundle
- How to Check and Change Refresh Rate on Windows 11


It’s much easier to just use a Windows 10 install USB and replace install.wim from 11
This no longer works with 22H2 Build 22621.