The Galaxy Note 4 is huge on demand that Samsung just delayed the release in UK to Oct 17th, 2014, but that hasn’t stopped legendary developer Chainfire from rooting the Galaxy Note 4. Chainfire has successfully rooted the Note 4 with the CF Auto Root package that he has been releasing for almost all Samsung Galaxy devices since the last 4 years.
The Samsung Galaxy Note 4 SM-N910C runs on Samsung’s own Exynos5 chipset. The processor is great on performance but doesn’t support LTE bands. And hence, the Exynos5 processor doesn’t comes on Note 4 devices in the US and other LTE supported carriers which usually lock the bootloader on their devices so they can’t be rooted. But since the SM-N910C is comes with unlocked bootloader, it was only a matter of minutes for Chainfire to root the SM-N910C Galaxy Note 4 variant.
Chainfire’s CF Auto Root works for most Samsung devices, and the Galaxy Note 4 root has also been achieved using the same root package. CF Auto Root uses Chainfire’s own SuperSU app to manage Superuser permissions for root access to apps and ADB.
So withour any further ado, let’s get to the rooting instructions for Galaxy Note 4 SM-N910C. Make sure you follow the instructions word-to-word for fail-proof Galaxy Note 4 root.
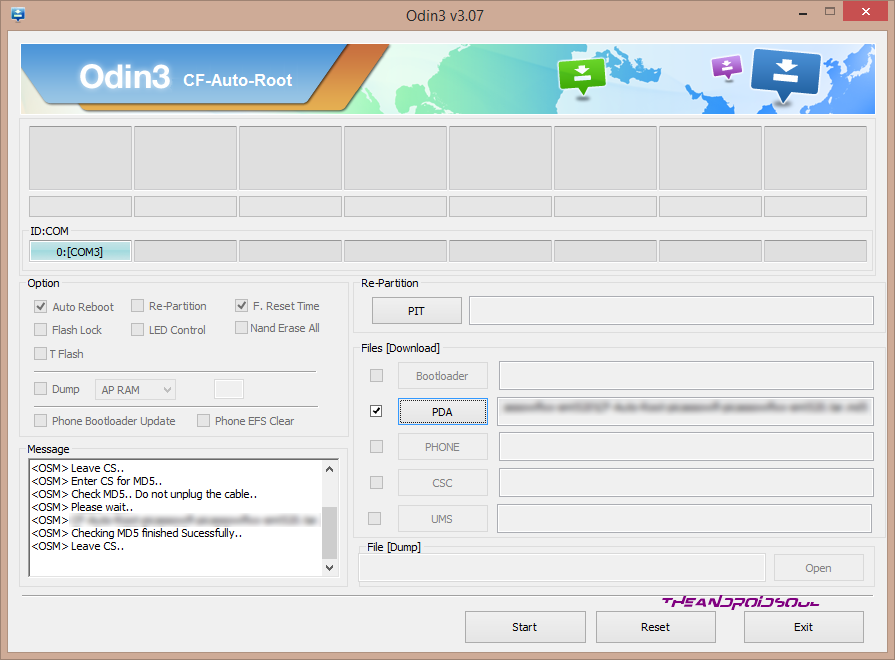
Warranty may be void of your device if you follow the procedures given on this page. You only are responsible for your device. We won’t be liable if any damage occurs to your device and/or its components. Before you begin with guide instructions below, make sure your android device is adequately charged — at least 50% battery of the device. To make sure your device is eligible with this, you must first confirm its model no. in ‘About device’ option under Settings. Another way to confirm model no. is by looking for it on the packaging box of your device. It must be SM-N910C! This guide is specifically for the Samsung Galaxy Note 4 with model no. SM-N910C. Do not use the procedures discussed here on any other device of Samsung or any other company. You have been warned! Back up important data and stuff before you start playing around here as there are chances you might lose your apps and app-data (app settings, game progress, etc.), and in rare case, files on the internal memory, too. For help on Backup and Restore, check out our exclusive page on that linked right below. ► ANDROID BACK UP AND RESTORE GUIDE: APPS AND TIPS You must have proper and working driver installed on your windows computer to be able to successfully root your Galaxy Note 4. If you are not sure, check the link below. ► SAMSUNG GALAXY NOTE 4 DRIVERS INSTALLATION GUIDE Download the CF Auto Root file given below and transfer it to a separate folder on your computer (just to keep things tidy, that is). DOWNLOAD LINK | File name: CF-Auto-Root-trelte-treltexx-smn910c.zip (25 MB) Important Note: Backup important files stored on internal SD card of your device, so that in case a situation arises requiring you to do a factory reset after rooting, which might delete internal sd card too, your files will remain safe on PC. If you see FAIL message instead of the RESET or PASS in Odin’s top left box, that’s a problem. Try this now: disconnect your Galaxy Note 4 from PC, close Odin, remove phone’s battery and put it back inside in 3-4 seconds, open Odin and then repeat from Step 3 of this guide again. Also, If device is Stuck at setup connection or on any other process, then too, try this: disconnect your Galaxy Note 4 from PC, close Odin, remove phone’s battery and put it back inside in 3-4 seconds, open Odin and then repeat from Step 3 of this guide again. NOTE: It may happen that your phone doesn’t automatically boot into recovery and root your phone. In that case follow the following above procedure except that in Step 7, Auto Reboot option is un-checked and then the instructions below: That’s all. If you need help regarding this, feel free to ask us in comments below. It was easy to root Galaxy Note 4 SM-N910C using CF-Auto-Root, right? Let us know how you plan to use root privileges on your Galaxy Note 4 now. Suggestions are most welcomed!ROOT PACKAGE INFO
Name
CF Auto Root One Click Tool
Warranty
Void Warranty.
Stability
Stable Without Any Issues
Root Manager App
SuperSU. It manages root permissions for apps on the device.
Credits
Chainfire.
WARNING!
GUIDE: ROOT GALAXY NOTE 4 SM-N910C
STEP 0: CHECK DEVICE MODEL NO.
STEP 1: BACKUP YOUR DEVICE
STEP 2: INSTALL LATEST DRIVER
STEP 3: INSTALLATION INSTRUCTIONS
DOWNLOADS
CF AUTO ROOT FILE
STEP-BY-STEP GUIDE
└ For further help, check out our post on Galaxy Note 4 Download Mode →

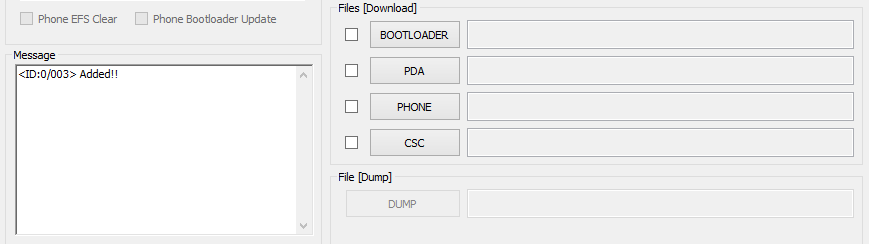
If you don’t get the Added! message, here are some troubleshooting tips:
Your Odin window should look like the screenshot below:
Feedback Us!


