Your internet connectivity isn’t always to blame for slow download speeds. There are a variety of reasons why you may not be getting the most out of your internet connection. But we are here to fix that. From turning off apps that hog data to digging deep into Windows policies. Here’s a bunch of fixes you can apply to shave off those precious milliseconds and ensure your download speeds are at their peak.
Top 9 ways to increase download Speed on Windows 10:
Here are our best tips to increase the download speed on your Windows PC or laptop and make sure you are getting full speeds as enabled by your internet service provider.
1. Free up 20% bandwidth Windows keeps for itself
Windows 10 also keeps 20% of your internet’s bandwidth for its own purposes. That means you’re only ever operating with 80% of whatever your ISP told you your internet speed would be. That is a lot of bandwidth which, when freed up, can do wonders to your download speeds. Here’s how you can do so:
Method 1.1 – For Windows 10 Pro Users
Press Start, type Run, and open the app.

Type gpedit.msc and hit Enter.

This will open up Local Group Policy Editor. Inside it, expand Computer Configuration, then Administrative Templates, and click on Networks. On the right, scroll down to find QoS Packet Scheduler and double-click on it.

Then Double-click on Limit reservable bandwidth.

In the new window, select Enabled. You will see that the Bandwidth limit (%) is set to 80%. Set it to ‘0’ and click ‘OK’‘.

This will free up that precious 20% of your Internet Bandwidth that Windows had been keeping from you till now.
Method 1.2 – For Windows 10 Home Edition Users
Windows Home users don’t have access to Group Policy Editor. But the same can be downloaded and set up with ease.
Download: gpedit-enabler.bat
Once you have downloaded the file, right-click on it and select Run as administrator.

The installation will begin in the Command prompt and may take a while. Once it is all done, press any key to finish.

From here on, you can follow the same steps given for Windows 10 Pro users to get the additional 20% bandwidth from inside Group Policy Editor.
2. Change DNS Server
Domain Name Systems are usually setup or detected automatically by your Internet Service Provider (ISP). Even though DNS doesn’t directly relate to Internet speed, it does have an impact on how fast a website loads on your computer.
Being the internet’s main address book, you are interacting with DNS all the time. Every time you open a program, link, or an image that is not on a part of a website’s main page, it requires a DNS lookup.
So, it is only right that if you increase the speed of these DNS lookups, everything gets faster. DNS providers can vary in speed, and no, your ISP doesn’t prioritize DNS speeds. But there are several open DNS servers that can bump up your download speed. Here’s how you can change your DNS.
Click on Start and select Settings.

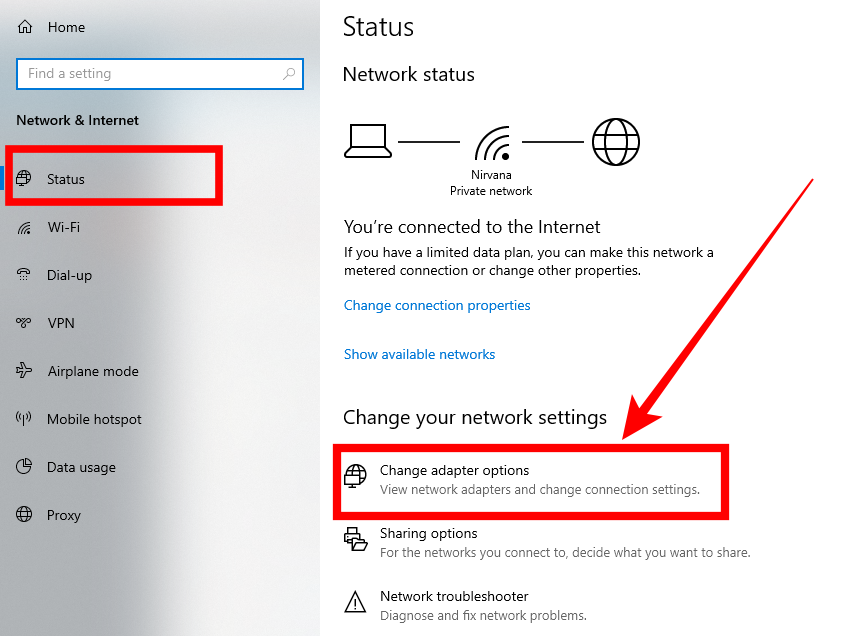
Click on Network & Internet.

On the Status page, choose Change adapter options.
Right-click on your network connection and click Properties.

In the window that opens up, click on Internet Protocol Version 4 (TCP/IPv4) and click Properties.

In the General tab, click on Use the following DNS server addresses.

Now, you will have to key in the Preferred DNS Server and Alternate DNS Server. Here are four of the most trusted, high-speed DNS providers:
- Google Public DNS: 8.8.8.8 and 8.8.4.4
- Cloudflare: 1.1.1.1 and 1.0.0.1
- Quad9: 9.9.9.9 and 149.112.112.112
- Cisco OpenDNS: 208.67.222.222 and 208.67.220.220
We have chosen the Google Public DNS which is what most users tend to opt for. This should do the trick of (indirectly) improving your internet and download speeds.
3. Turn Off Data Hogging Apps
There are some apps that constantly use the Internet to download files, upload, and sync them. This can shift the bandwidth away from what you actually want to do. In order to wrest back control of your Internet consumption, it is time to disable or close these apps for good, especially if you’re looking to download big files.
Open up Settings and click on Network & Internet as shown before. Then, from the sidebar on the left, choose Data usage, and click on View usage per app.

Your apps will be listed in descending order of their data usage.

Find the ones that you think are hogging a lot of data and… well, let them go.
4. Disabled Metered Connection
While we’re in the Network & Settings area, let’s fix another thing – metered connections. A metered connection places a limit on data usage and download speeds. If this feature is enabled on your connection, disable it.
Inside Network & Settings, click on Change connection properties.

Find Metered connection. If this option is On, set it to Off.

5. Change Bandwidth Limit
The unfortunate thing about Windows 10 is that it uses a certain amount of your bandwidth to download updates and apps. If you think it is using too much bandwidth, it’s time to set it right. Here’s how you can do it:
Open Settings as shown before and click on Update & Security.

Click on Advanced options

Select Delivery Optimization

Select Advanced options

In this next window, you can set a cap on the bandwidth that Windows can use for its tasks by checking the boxes and shifting the Download settings slider.

6. Disable P2P Updates
While we’re inside Delivery Optimization, we can also turn off P2P updates so that others in your household or strangers in the vicinity don’t use up your internet resources.
Inside Delivery Optimization, find Allow downloads from other PCs and turn it Off.

7. Turn Off Background Apps
Many of your apps have the annoying habit of running in the background and sucking up your Internet connection. The result? Slower internet and download speeds. Disabling them is necessary to unlock that extra bit of speed. Here’s how to do it:
Open Settings and click on Privacy.

Scroll down the left sidebar and find Background Apps. On the right, turn off Let apps run in the background.

Alternatively, you can individually select the apps that aren’t terribly important to you and stop them from running in the background.
8. Delete Temporary Files
Your computer also holds up a lot of temporary files and cache that may be taking up some of your internet speed. This can clog up your bandwidth resulting in poor download speeds. Although this option doesn’t lead to a significant bump in speeds, every bit counts. Here’s how you can delete temporary files:
Open Settings and click on System.

On the left sidebar, click on Storage. Toggle Storage Sense to On and click on Configure Storage Sense or run it now.
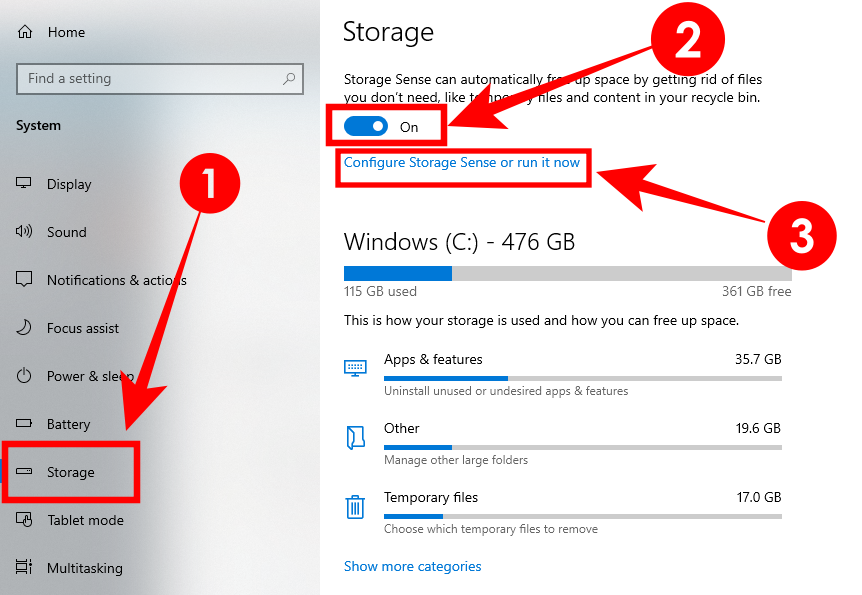
In the new window, click on Clean now at the bottom.

9. Disable Windows Updates
We don’t recommend disabling the Windows Updates service, per se. Keeping Windows updated is crucial to keep all kinds of bugs and issues at bay and get the best experience that Microsoft wants you to have.
But if you find that your internet speed is on its last legs and you wish to have higher download speeds for some time, then disabling the Windows Updates service may work in the short-term. You can always revert them back.
Press Start, type services, and click on the app.

In the Services window, scroll down to the bottom and find windows update. On the left-hand side, click on Stop. This will stop Windows Update.

Now, right-click on windows update and select Properties.

Under the General tab, change Startup type from manual to Disabled.

That’s about it. This should turn off the Windows update for good and disable it from starting when you boot your computer.
Why I can’t increase the download speed on my Windows 10?
If all the aforementioned methods don’t lead to a palpable jump in download speeds for you, then you may be severely limited by your internet provider/plan. It helps to know what your maximum speed is on your current plan before you decide to make a shift.
How to know what is the maximum speed for you
It all depends on your internet plan. But don’t just take your ISP’s word for it; do the tests and find out what your internet connection’s maximum speed can be. There are a bunch of internet speed tests that you can take on the internet.
Some of them include Speedtest.net, Internet Health Test, Fast.com, and many more. Take your pick and find out the maximum download speed that you can get. Do note that the maximum download speed that will be indicated in the tests is actually discerned by the slowest performing part of the complete data transfer test.
How to know you are getting really good speed already
Your connection’s download speed is actually based on the 1:8 connection ratio. This means that your download speed will be 1/8th of your internet speed. For instance, if you have a 100mbps connection, you can expect somewhere around 12mbps download speed. Even then, if you are getting only 10mbps, that may be the maximum that your ISP has set.


Hi, it is a very simple to increase your download speed, just you need to download the internet download manager and install into your computer.
Hi, download speed is so classic, you just need to download the internet download manager and install it on your pc.
its is tought Methodd if You want Download Any File so You SHould Must Download Manager because Its Get fast Speed Rathan Than without Manager.
i have an internet speed of 350Mbs, but only manage to get max 0,5-1,5Mbs download, idfk why that is but its annoying af things take ages to download that way
its is tought Methodd if You want Download Any File so You SHould Must Download Manager because Its