
Windows 11 Dev build is out now and it’s all well and good if you want to get your hands on it as soon as physically possible. But considering that this is just the Dev build, it is not all peachy perfect. It might take some time to get adjusted to the new UI and there are many changes that we think (and hope) Microsoft will include in future preview builds and the stable Windows 11 that is coming out this holiday season.
Until then, you can install Windows 11 on your PC without having to say goodbye to its predecessor that’s been with us for 6 years now. Here’s everything you need to know to dual boot Windows 11 and Windows 10 on your PC.
Related: How To Install Windows 11 From USB
Step 1 (Optional): Create a separate drive for Windows 11
In order to install and dual boot Windows 11 on a PC that’s running another version of Windows, you have to create a separate drive that will remain assigned to Windows 11. It needs its own space (at least 64 GB) to boot and load its components to run effectively.
Although you can select any one of your drives to install Windows 11 on, it is better to create a separate drive to keep things well-demarcated and organized.
First up, press Win+R to open up the RUN box. Type diskmgmt.msc and press Enter.

Now, we are going to create a partition for Windows 11. Right-click on a drive and select Shrink volume.

Here, you will see the space that’s available for shrinking. You need to have at least 64 GB of space so make sure you have chosen the disk that can allocate that much space, to begin with. Now Enter the amount of space to shrink in MB. Then click on Shrink.

You will now see the Unallocated space appear in Disk management. Right-click on it and select New Simple Volume.

This will open up the wizard, click Next.

Click Next again.

Assign the new drive a letter and click Next.

Now, give the volume a label and click Next.

Click on Finish.

Your new separate drive is now available.

Let’s move on to installing Windows 11 on it.
Step 2: Download Windows 11 ISO file
The next (first) step is to download the Windows 11 ISO file. As the Windows 11 Dev build is currently only available to Windows Insiders via Windows updates, you will have to circumvent that process by using the UUP Dump tool to create an ISO file.
Use this guide to download the ISO file from Microsoft itself:
Once you have the ISO file you will have to create a bootable drive with it in order to install Windows 11 via the Boot menu. This is because only when installing Windows via the Boot menu will you get the option to select the drive. Otherwise, Windows will assume that you’re updating your PC and automatically assign the drive.
Use this guide to create a bootable USB with Windows 11:
Note: Before creating a bootable pen drive, be sure to convert the USB drive to GPT partition type if it is of MBR type. Windows 11 installation requires the bootable pen drive to be of GPT type.
Step 4: Select the drive to install Windows 11
Once you have created a bootable USB, it is now time to start installing Windows 11 via the Boot menu. For this process, first up, shut down your PC. Then, turn it back on and press F8 to restart the PC into boot mode.
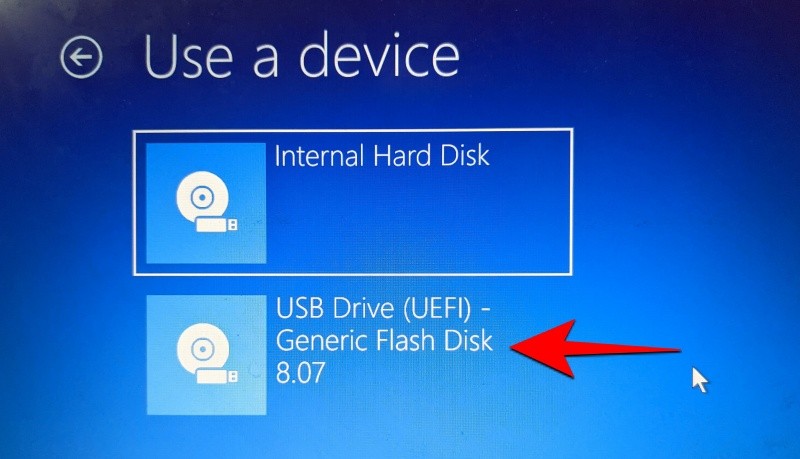
Once you’re in Boot mode, click on Use a device.
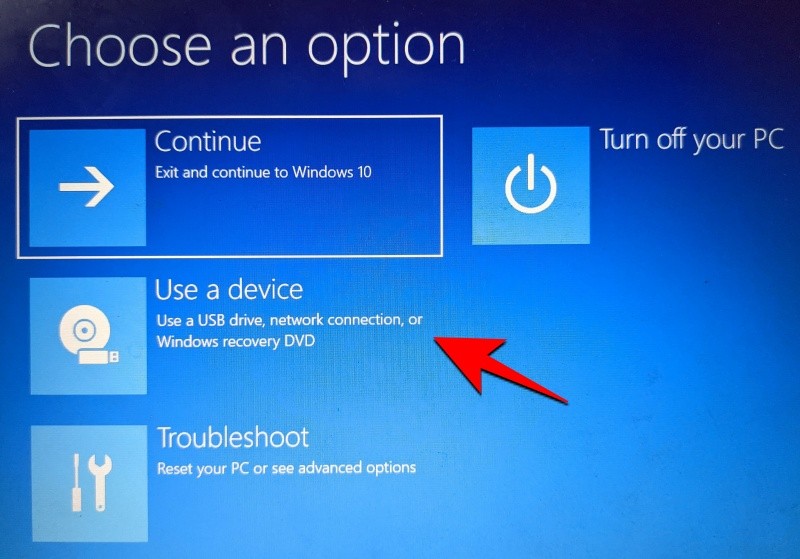
Then select your USB Drive.
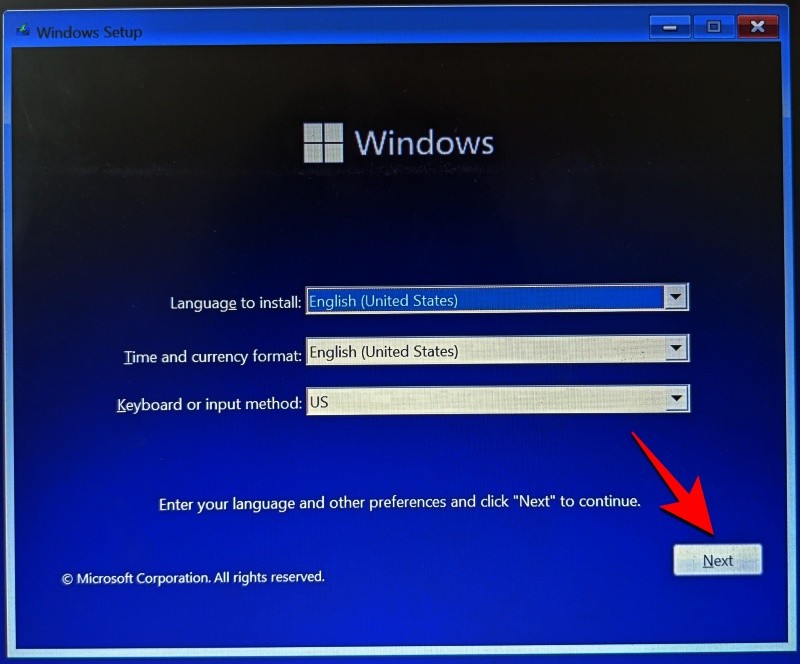
The Windows 11 setup should start. Click Next to proceed.
Then click on Install now.

Select Windows 11 and click Next.

Accept the terms and conditions and click Next.

Now – this is the important bit – click on Custom: Install Windows only (advanced).

You will be asked to select the drive where you want to install Windows 11. You can select whichever drive you prefer (as long as it has a minimum available space to install Windows 11). Don’t worry, your data will remain intact. However, this drive will become the system drive and will be the main directory for all Windows 11 operations.
That is why it is better, on the whole, to install it on a separate drive. If you have created a separate drive as mentioned in Step 0.1, select this drive to install Windows 11 and click Next.

Now just follow the on-screen instructions and wait for Windows 11 to be installed. Once completed, you will have access to both Windows 10 and the newly installed Windows 11.
How to choose the default OS to boot between Windows 11 and Windows 10
Open the Settings app, and then click System. Or, click Win+X and select System.
Now, click Advanced system settings.

Click Settings under Startup and Recovery.

Click the dropdown menu under Default operating system.

Select the OS of your choice you want to be of default.
Select how much time you want the system to allow you to select the OS when you restart the PC before booting up with the default system you chose here.

That’s all.
How to install Windows 10 on a Windows 11 PC as dual boot
Well, you can. Use the same procedure as given above to install Windows 10 over Windows 11. You will need to download the Windows 10 ISO (get from Microsoft from here) and then use Rufus to create Windows 10 bootable pen drive.
Now, boot into EUFI/BIOS boot mode and select pen drive as your installation method. Follow the rest of the procedure as given above and you will be good to go.
Let us know if you need any help with dual booting Windows 11 on Windows 10 or vice versa.


How To Dual Boot Windows 11 with Windows 10: Step-by-step guide
When I try to copy this article, and paste it into Word, the images are blank spaces. Tried to copy an image using screenshot, and still no luck.
Dear Jan:
I solved the problem right clicking in each image and chose save image to all of them and wrote a number. I did this 21 times. I wrote this numbers in the place they have. For this, first I selected all the article and copied and pasted in a Word page. I am an argentine guy living in Dominican Republic +1 809 216 7707 WhatsApp
Thank you for the excellent step by step directions. However, when I attempt to install Windows 11 from the bootable USB thumb to my newly created drive W (on an SSD running inside an Inateck SSD USB holder), Windows will not install to this drive and I get the message it will only install to a GPT drive…I must have missed something in the steps, as I used Rufus to create the thumb drive, and it boots and attempts to load windows, but the destination drive isn’t partitioned in GPT. Is there a tool to convert an MBR partition to a GPT partition? The drive is blank, so there is no data to lose. Thank you in advance for any additional guidance you can provide.