Google introduced screen recording on Android with the Android 4.4 KitKat release, but the functionality was only available via ADB, which is a thing of developers so that cuts out a lot of Android users from using the screen recording feature on Android. However, if you had a rooted Android device, you could easily do the screen recording right on the phone without ADB using apps like this.
Anyway, thanks to Android 5.0 Lollipop, we can now record videos without the need of ADB and hence without root access as well. There isn’t a combination of keys like screenshots to begin screen recording, but a new API in Android 5.0 now allows developers to build apps that can record screen without the need of root access.
And look at the speed, Android app developers work at. It has only been a few days since Google released the Android 5.0 lollipop and detailed all the new APIs in the update, and we already have a couple of new apps in the Play store which takes advantage of the new API and let’s users record screen on Android.
Below are the two apps that just released on Play store for recording screen on Android without root.
► ilos Screen Recorder – No Root | ► Lollipop Screen Recorder
We tested both the apps, the Lollipop Screen Recorder is straightforward but crashes a lot but it’s a very quick release so we expect the app to gain stability in the coming days. The ilos Screen Recorder app, however, works like a charm.
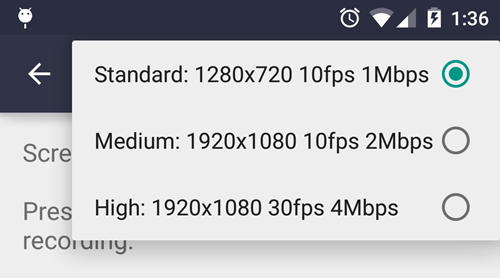
On features front both the apps lack a lot at this time. But thankfully, ilos Screen Recorder at-least has options to select resolution size for recording video. As you can see, ilos is a better app of the two so we’re going to use it to show you how to record screen on Android 5.0.
HOW TO RECORD SCREEN ON ANDROID 5.0
- Download/Install the ► ilos Screen Recorder – No Root app on your device running Android 5.0 Lollipop.
- Open the app, and don’t bother registering an account just yet.
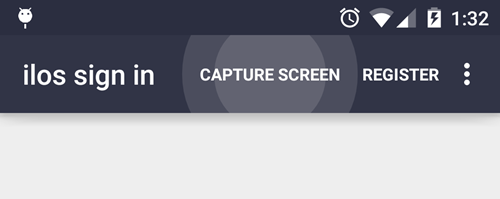
- Touch the “CAPTURE SCREEN” text at the top center of the app.
- From here on, you can begin recording your screen. But if you’d like to adjust video resolution first, just tap “QUALITY” in the top right corner and select the video resolution of your preference.
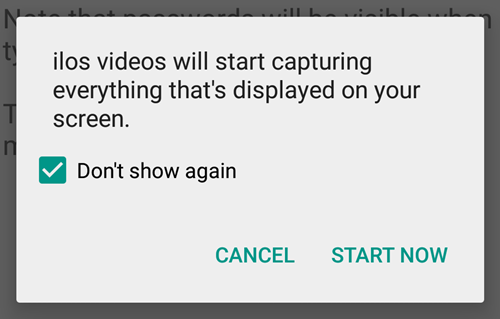
- Tap “START CAPTURE” to initiate screen recording. You’ll see a prompt asking you to confirm your action. This comes from Android rather than the ilos app, and is in concerned to your privacy so that no app could silently start recording screen on your Android device without your knowledge.
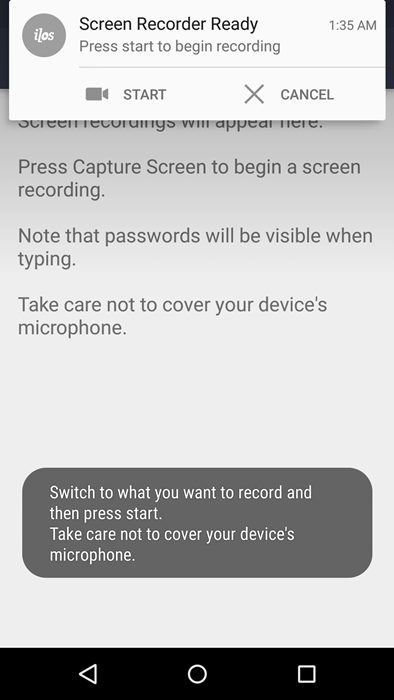
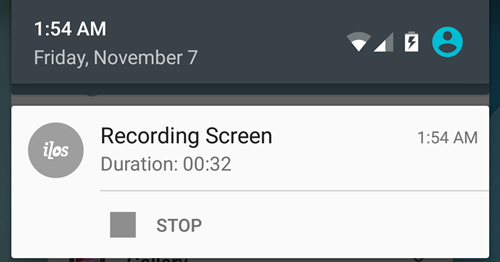
- Next, you’ll see a heads-up notification on the screen saying “Screen recorder Ready”. The notification will be sticky and is there so that you can move to the screen where you wish to begin the screen recording.
- Press Start to begin recording, and when you’re done, pull down the notification bar and touch “Stop”.
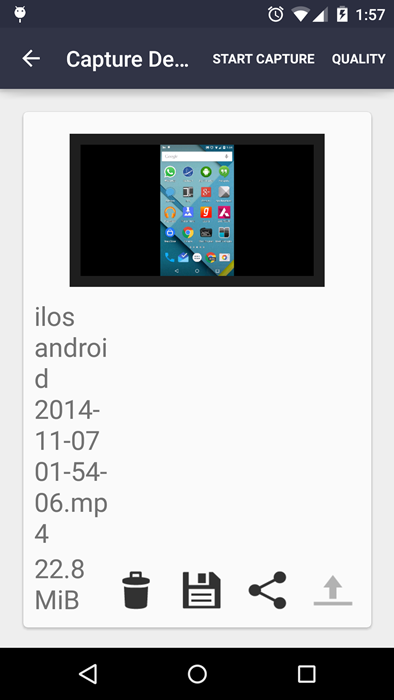
- You’ll see the following screen next, here you’ll see the controls to view, delete or save the video.
- Touch the Save icon (2nd in row at the bottom) to save your video. It’ll be saved to /movies/ilos/ folder on the device.
That’s all. Enjoy recording screen on your Android device when needed.

