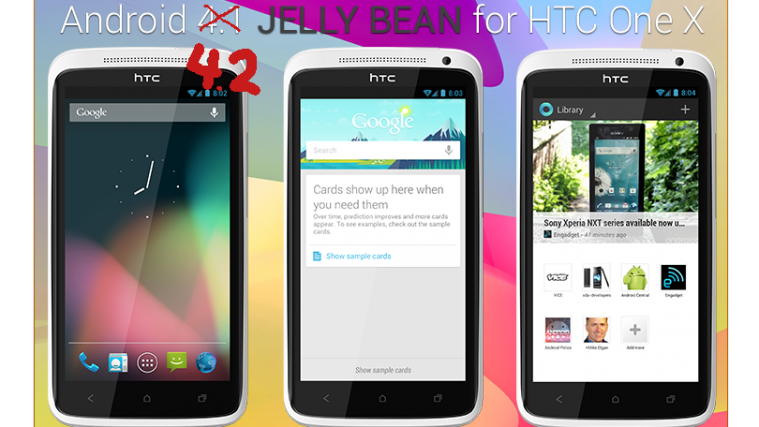
With the Android 4.1 update having arrived on the HTC One X only in October, there is no doubt that Android 4.2 will take quite a lot of time to officially arrive. However, as always, the Android development community always comes to the rescue to provide a taste of newer Android versions immediately after Google releases them, and now an Android 4.2 ROM has come out for the HTC One X.
XDA forum member pabx is responsible for releasing the ROM, which will let you try out new features from Android 4.2, like a Swype-like keyboard, lockscreen widgets, Photo Sphere camera mode for 360 degrees panorama photos, quick settings toggles in the status bar, newer information cards in Google Now, Daydreams screensaver mode, and improved performance over Android 4.1.
However, due to being in its early stages of development, the ROM does have quite a few stuff that isn’t working yet. Here’s the list of what currently works and what doesn’t, quoted from the source, where the most updated list of issues can be found:
Working
- Wireless
- Phone calls
- GSM Data (still needs some more testing)
- Audio Output
- Non-HD Video (eg: YouTube HD is broken)
- GPS
Not Working
- Camera
- HD-Videos
- Audio recording (= no VOIP, crashes the audio subsystem)
- Bluetooth
- Fails to boot on phones running HBOOT 1.31 (if you have hboot 1.31 and would like to have this fixed: please join our IRC channel)
- ..and probably some other things.
Also, keep in mind that this is based on stock AOSP Android as found on Nexus devices, so there won’t be any of the HTC-specific features found in stock ROMs, and some apps, like the camera or gallery apps, will be different than the default ones.
Now, let’s take a look at how the Android 4.2 ROM can be installed on the HTC One X.
Compatibility
This guide is applicable only for HTC One X. Do not try this on any other device, not even on the HTC One X+.
Warning!
The methods and procedures discussed here are considered risky and you should not attempt anything if you don’t know completely what it is. If any damage occurs to your device, we won’t be held liable.
How to Install Android 4.2 ROM on HTC One X
- The procedure to install the ROM involves unlocking the bootloader on the device, which will wipe everything on the device, including everything on your internal storage. First, backup installed apps and personal data such as contacts, messages, bookmarks, etc, by referring to our Android Backup Guide for help. Then, copy everything from the SD card to your computer, which will also include the apps and data you backed up.
- The phone’s bootloader will need to be unlocked to flash the ROM. You can unlock the bootloader on your One X by following the guide → here. Make sure you took a backup in step 1 as this will wipe all data from the phone and reset it to factory settings. Skip this if you already have the bootloader unlocked.
- Install ClockWorkMod (CWM) recovery by following the guide → here. Skip this step if you already have CWM recovery installed on the phone.
- Download and install HTC Sync software on your computer in order to install the required drivers for the phone.
Download HTC Sync
Skip this step if you already installed the drivers while following step 2, or if you have HTC Sync installed already. - Download the latest version of the ROM from the source page.
- Copy the ROM’s file (don’t extract it) to the phone.
- Also download the Flash_Boot.zip file from → here. This is required to flash the necessary boot image on the phone.
- Extract the Flash_Boot.zip file to a convenient location on the computer.
- Open the ROM’s zip file (downloaded in step 5) on the computer and extract the boot.img file from inside it. Then, copy the boot.img file to the folder where you extracted the Flash_Boot.zip file in step 8. You will then have the following files in the folder as shown in screenshot below:
- Switch off the phone. Boot into the bootloader mode first by holding the Volume Down button while powering on the phone. Then, select FASTBOOT from there using the volume buttons to navigate and power button to select to enter fastboot mode. Then connect your phone to the computer.
- Go to the folder where you extracted the contents of the Flash_boot.zip file in step 8. Double-click the flash-boot-windows.bat file to flash the required kernel.
- After the kernel is flashed, the window that showed up will automatically close. It might also say OKAY/finished and remain open, in which case you can close it yourself.
- Now, press the power button on the phone to select BOOTLOADER, then navigate to the RECOVERY option and select it using the power button to boot into ClockworkMod recovery.
In recovery, use volume keys to scroll up and down between options and power/home key to select an option. - Select wipe data/factory reset, then select Yes on the next screen to confirm data wipe. This will only delete your installed apps and settings, but will leave all other files and data on the SD card intact.
- Then, select install zip from sdcard, then select choose zip from sdcard. Scroll to the ROM file on the SD card and select it. Confirm installation by selecting Yes on the next screen.
- After the installation is complete, select go back and then select reboot system now to reboot your phone into Android 4.2.
Android 4.2 is now installed and running on your HTC One X. Try it out, and don’t forget to visit the source page for further updates and details on the ROM.


