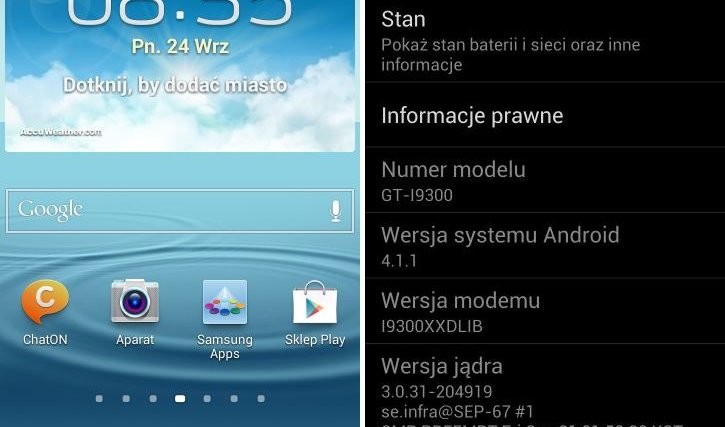
The official Android 4.1 Jelly Bean update is finally rolling out over the air to the Samsung Galaxy S3. Users in Poland are seeing the official update notification in Kies, indicating that Samsung has finally started pushing the official update, and other countries should get the update in the following days according to Sammobile. Finally, we can say goodbye to all those leaked updates.
The firmware for the official update – XXDLIB – has also been released online, which people can use to manually update in case they do not want to wait for the update to roll out in their country. The firmware will work for Galaxy S3’s from any country, though those with a Galaxy S3 from a country other than Poland, or those flashing it over a custom ROM might need to wipe the data on their device in order to make it work (which can be restored later).
So get your Galaxy S3 out and let’s update it manually to the official Android 4.1 Jelly Bean firmware.
Compatibility
This hack and the guide below are compatible only and only with the international Galaxy S3, model number i9300. It’s not compatible with the US variants or other devices. Check your device’s model number in: Settings » About phone.
Warning!
The methods and procedures discussed here are considered risky and you should not attempt anything if you don’t know completely what it is. If any damage occurs to your device, we won’t be held liable.
How to Update Galaxy S3 to Official XXDLIB Android 4.1 Firmware
- [Important] If you flash this firmware over a custom ROM or a Galaxy S3 from another country than Poland, you might need to wipe the data on the phone to make the firmware boot up properly.
To be sure you do not lose any data, backup your Apps and important data — bookmarks, contacts, SMS, APNs (internet settings), etc. This Android backup guide would help you. The SD card contents are always safe, so there is no need to back up those. Only backup apps and personal data.
NOTE: Don’t forget to at least note down your network’s APN settings, which are required to make mobile data work. Go into Settings » More » Mobile Networks, click on the APN that is in use, then note down the setting for each field. While APN settings should be automatically restored from network, you can enter them manually if needed to make mobile data work. You can also find your APN details → here. - Download and install the software Kies on your computer, which will install the necessary drivers for the phone.
Download Kies
You can also download the drivers directly — download from here: 32 bit (x86) Windows | 64-bit (x64) Windows - Download the firmware.
Download XXDLIB | Alternate Link | Filename: GT-I9300_XEO_1_20120922093900_w8pdod73hi.zip - Extract the GT-I9300_XEO_1_20120922093900_w8pdod73hi.zip file on the computer to obtain a file named I9300XXDLIB_I9300OXFDLI1_I9300XXDLIB_HOME.tar.md5 (ignore the file named SS_DL.dll).
- Download the Odin PC software. If you are new to this, Odin is what is used to flash stuff – firmware, kernels, etc. – on Samsung phones. We’ll use Odin to flash the firmware file obtained in step 4.
Download Odin3 v3.04 | Filename: Odin3_v3.04.zip - Extract the contents of the Odin3_v3.04.zip file to a folder on your computer.
- Now, turn off your Galaxy S3 and wait for it to shut down completely.
- Then, put the phone into download mode. To do so, press and hold these keys together: Volume Down + Home + Power till the screen turns on. Then press Volume Up to enter download mode.
- Open Odin by double-clicking on the Odin3 v3.04.exe file obtained in step 6 after extracting Odin3_v3.04.zip.
- Important! Connect your phone to PC now. You should get the message “Added !!” under Odin’s message box in the bottom left.
- If you don’t get this message, make sure you installed drivers correctly (using Kies or directly) as given in step 2. If it still doesn’t work, try changing to another USB port on the computer and also use the USB ports on the back if you have a desktop PC.
- Click on the PDA button in Odin, then browse to and select the I9300XXDLIB_I9300OXFDLI1_I9300XXDLIB_HOME.tar.md5 file obtained in step 4 above.
- Important! Do not make any other changes in Odin except selecting the required files as given in step 11. Leave all other options as they are. Make sure Re-Partition check box is not selected.
- Now, click the Start button to start flashing the firmware on your phone. When the flashing is complete and is successful, you’ll get a PASS message (with green background) in the left-most box at the very top of the Odin, and the phone will automatically reboot. When you see the Samsung logo, you can safely unplug the cable.
- What do if Odin gets stuck or doesn’t do anything: If ODIN gets stuck on setup connection or at any stage of this process after you’ve hit the Start button, and doesn’t seem to be doing anything, or if upon completion of the process you get a FAIL message (with red background) in ODIN, do this: disconnect the phone from the PC, close ODIN, remove battery for 4-5 seconds, re-insert it, turn phone on in Download mode again, and do the procedure again from Step 9.
- [Important] After you get the PASS message and the phone reboots, the phone might get stuck at the booting animation. If that happens, perform the following steps to make it boot. Remember that these steps will wipe your personal data like contacts, apps, messages, etc. If your phone has already booted, skip these steps, your phone has been updated successfully:
- Boot to recovery mode — for which, first power off phone (by removing battery and reinserting it), wait for 5-6 seconds, and then press and hold Home + Volume Up + Power keys together till the screen turns on, then let them go to boot into recovery. Once you are in recovery mode, use volume keys to move the selection up and down and home/power key to select the option.
- Go to Wipe data/Factory Reset and select it. Select Yes on next screen.
- Then, select reboot system now to reboot the phone, which will now boot properly.
- If you run into any roadblocks while flashing the firmware, let us know and we’ll help you out.
Your Galaxy S3 is now running the official Android 4.1 firmware. Do let us know how it works, and enjoy the butter smooth performance!


thank you guys, but does it require the ” USB Debugging ” to be ticked before flashing this rom ?
thank you
Won’ hurt, you can enable that if you want. Works to me even without that.
thank you bro. you’re right, even without usb debugging it will work, but sometimes it will not.
Thnx. But yes, we should put that as a note there in our guides so that in case it gets stuck for anyone, he has anther way to do it.
Odin/download mode doesn’t have any relation to any setting in Android, so things like USB Debugging don’t really matter. Since Odin is a program that allows recovering of devices by flashing stock firmware, such dependencies would defeat the purpose.
But anyway, the settings in the OS have no bearing on the way Odin/download mode functions 🙂
True story!!! :face:
Make sure tell this to everyone who asks in comments otherwise it falls on me, haha 😛
Upgraded but now I get a ‘not registered on Network’ everytime I try to make a call – any pointers woudl help.
Thanks
Which country you are from? You might need to flash a modem on your phone, which is more suited to your region, using Odin, as you flashed the firmware.
Hey, make sure that the phone is not in Airplane Mode, and do try this: power off phone, wait 5-6 seconds, take the battery and sim out for 4-5 seconds and then insert them both back (sim in correct position), then restart the phone.
Yea I checked – not in airplane mode – removed it with battery out and still no joy – I’m in Ireland – even check the sim on another phone.
thank you guys, but does it require the ” USB Debugging ” to be ticked before flashing this rom ?
thank you
Won’ hurt, you can enable that if you want. Works to me even without that.
thank you bro. you’re right, even without usb debugging it will work, but sometimes it will not.
Thnx. But yes, we should put that as a note there in our guides so that in case it gets stuck for anyone, he has anther way to do it.
Odin/download mode doesn’t have any relation to any setting in Android, so things like USB Debugging don’t really matter. Since Odin is a program that allows recovering of devices by flashing stock firmware, such dependencies would defeat the purpose.
But anyway, the settings in the OS have no bearing on the way Odin/download mode functions 🙂
True story!!! :face:
Make sure tell this to everyone who asks in comments otherwise it falls on me, haha 😛
Upgraded but now I get a ‘not registered on Network’ everytime I try to make a call – any pointers woudl help.
Thanks
Which country you are from? You might need to flash a modem on your phone, which is more suited to your region, using Odin, as you flashed the firmware.
Yea I checked – not in airplane mode – removed it with battery out and still no joy – I’m in Ireland – even check the sim on another phone.
Hey, make sure that the phone is not in Airplane Mode, and do try this: power off phone, wait 5-6 seconds, take the battery and sim out for 4-5 seconds and then insert them both back (sim in correct position), then restart the phone.
doesnt give me the pass message what could be ? helpppp
doesnt give me the pass message what could be ? helpppp
doesnt give me the pass message what could be ? helpppp
doesnt give me the pass message what could be ? helpppp
doesnt give me the pass message what could be ? helpppp
everything works great !! 😀
just one complain i try getting into ” S suggest app ”
but it says ” this country is not supported ” ? why ?
everything works great !! 😀
just one complain i try getting into ” S suggest app ”
but it says ” this country is not supported ” ? why ?
everything works great !! 😀
just one complain i try getting into ” S suggest app ”
but it says ” this country is not supported ” ? why ?
thnaks very niceeeeeeeee
thnaks very niceeeeeeeee
thnaks very niceeeeeeeee
After update to JB every thing is working fine, after update i can see a dimmed light is continous on in the sensor near Samsung’s g logo next to earpiece the very first sensor on handset.
Please advice
After update to JB every thing is working fine, after update i can see a dimmed light is continous on in the sensor near Samsung’s g logo next to earpiece the very first sensor on handset.
Please advice
After update to JB every thing is working fine, after update i can see a dimmed light is continous on in the sensor near Samsung’s g logo next to earpiece the very first sensor on handset.
Please advice
hi, i am from india… can i update my s3 with this jelly bean…
can i update to jelly bean,,, i am from india
Yes, you can do that. But, better use the latest one available – http://nerdschalk.com/samsung-galaxy-s3-jelly-bean-update-xxdlih/
Yes, you can do that. But, better use the latest one available – https://nerdschalk.com/samsung-galaxy-s3-jelly-bean-update-xxdlih/
Hey bro how to wipe my data…?
I’m frm India
hi, i am from india… can i update my s3 with this jelly bean…
hi, i am from india… can i update my s3 with this jelly bean…
can i update to jelly bean,,, i am from india
Yes, you can do that. But, better use the latest one available – https://nerdschalk.com/samsung-galaxy-s3-jelly-bean-update-xxdlih/
Hey bro how to wipe my data…?
I’m frm India
can i update to jelly bean,,, i am from india
Yes, you can do that. But, better use the latest one available – http://nerdschalk.com/samsung-galaxy-s3-jelly-bean-update-xxdlih/
Hey bro how to wipe my data…?
I’m frm India
do you have to do a full wipe before installing jelly bean?
No.. follow the guide above, it tells you if and when you need to perform a full wipe.
do you have to do a full wipe before installing jelly bean?
No.. follow the guide above, it tells you if and when you need to perform a full wipe.
do you have to do a full wipe before installing jelly bean?
No.. follow the guide above, it tells you if and when you need to perform a full wipe.
got the job done thankx admin
got the job done thankx admin
got the job done thankx admin
works perfectally no problem tested to its roots every thing working beastly
works perfectally no problem tested to its roots every thing working beastly
works perfectally no problem tested to its roots every thing working beastly
am from Mauritius will it works??
3 time faild message what can i do?
Hey Mr Sam u are profecianel person thank u for helping us & goodluck to to prepair another news 🙂 (Y)
am from Mauritius will it works??
am from Mauritius will it works??
3 time faild message what can i do?
3 time faild message what can i do?
Hey Mr Sam u are profecianel person thank u for helping us & goodluck to to prepair another news 🙂 (Y)
Hey Mr Sam u are profecianel person thank u for helping us & goodluck to to prepair another news 🙂 (Y)
thank you so much i updated to jelly bean very nice5
thank you so much i updated to jelly bean very nice5
thank you so much i updated to jelly bean very nice5
I need help badly after updating from ICS to JB last night,i started this charging problem. If i plug my phone using the original charger my battery would still drain if im using it and if not it would take about 4 hours to fully charge it but i notice that after i plug it in to my computer it charges normally. My baseband model is 19300XXDLIB and i used Odin3-v1.85 (following the procedure). I have done a factory reset but still have this issue.Is there anyway i can revert back to ICS?
I need help badly after updating from ICS to JB last night,i started this charging problem. If i plug my phone using the original charger my battery would still drain if im using it and if not it would take about 4 hours to fully charge it but i notice that after i plug it in to my computer it charges normally. My baseband model is 19300XXDLIB and i used Odin3-v1.85. I have done a factory reset but still have this issue.Is there anyway i can revert back to ICS? by the way im in singapore
I need help badly after updating from ICS to JB last night,i started this charging problem. If i plug my phone using the original charger my battery would still drain if im using it and if not it would take about 4 hours to fully charge it but i notice that after i plug it in to my computer it charges normally. My baseband model is 19300XXDLIB and i used Odin3-v1.85 (following the procedure). I have done a factory reset but still have this issue.Is there anyway i can revert back to ICS?
I need help badly after updating from ICS to JB last night,i started this charging problem. If i plug my phone using the original charger my battery would still drain if im using it and if not it would take about 4 hours to fully charge it but i notice that after i plug it in to my computer it charges normally. My baseband model is 19300XXDLIB and i used Odin3-v1.85 (following the procedure). I have done a factory reset but still have this issue.Is there anyway i can revert back to ICS?
I need help badly after updating from ICS to JB last night,i started this charging problem. If i plug my phone using the original charger my battery would still drain if im using it and if not it would take about 4 hours to fully charge it but i notice that after i plug it in to my computer it charges normally. My baseband model is 19300XXDLIB and i used Odin3-v1.85. I have done a factory reset but still have this issue.Is there anyway i can revert back to ICS? by the way im in singapore
I need help badly after updating from ICS to JB last night,i started this charging problem. If i plug my phone using the original charger my battery would still drain if im using it and if not it would take about 4 hours to fully charge it but i notice that after i plug it in to my computer it charges normally. My baseband model is 19300XXDLIB and i used Odin3-v1.85. I have done a factory reset but still have this issue.Is there anyway i can revert back to ICS? by the way im in singapore
I tired the 3e recovery mode but it is getting stuck in the Samsung Logo.. PL help
I tired the 3e recovery mode but it is getting stuck in the Samsung Logo.. PL help
I tired the 3e recovery mode but it is getting stuck in the Samsung Logo.. PL help
Alright, i did it, it works. But its not butter smooth and now JB is available where i live. How do i “cancel” the manual one and install the official one?
Alright, i did it, it works. But its not butter smooth and now JB is available where i live. How do i “cancel” the manual one and install the official one?
Alright, i did it, it works. But its not butter smooth and now JB is available where i live. How do i “cancel” the manual one and install the official one?
hey there, I have done everything you told me but the message ADDED is not shown…..I updated KIES, used latest usb drivers, nor a recovery option crop up only I can get a download option….help anyone the device remain on the galaxy logo only….
Please tell me what did you do exactly. If you didn’t get Added messagem then you must be able to install anything using Odin. And thus, the phone should reboot normally. It appears you installed something wrong… so, please explain what and what you did. And what is your device’s model no.? Check on its packaging box. Or under the battery.
hello there thanks for replying, well I did as you explained in this tutorial..what i did is:
1. tried to enter in recovery mode by pressing the vol up+power+home together…nothing happened… I tried to enter in download mode….I entered in that mode correctly it seems for a change..
2. I did like your tutorial..installed kies let it be updated with the latest version and installed the usb drivers updated..
3. downloaded latest version of odin software 3.04
4. I tried to connect it like you said but nothing happen…
5. The mobile keep staying on the samsung logo screen without changing ( except the fact it can enter in download mode)
6. I tried several usb ports also and my pc is among the latest, am using a core i5 3rd generation so I hope that it is also recent hardware…
7. Am relying on your tutorial only to make this mobile work Am from Mauritius
The Model at the back is : GT-I9300
SSN: A3LGTI9300A
Its has an IMEI and a serial number which I tried in the kies software and it valided it correctly…
please help and advise buddy, I have tried in the past for a tablet Karbonn smart tab9 and I repaired it but this one seems to be tought..
In the step 8 above, you have to boot into download mode, not recovery mode. So, use Volume Down + Power + Home button to enter download mode. Don’t use Volume Up + Power + Home, as that leads to recovery mode.
Once in download mode, Odin will get you Added!! message. And you should be able to do it successfully.
Hello there, i forgot to mention this also…well I tried this one also which I forgot to mention but no message is cropped up in the odin 3.04..nor in odin 1.85…
well when I see the download mode screen : I can see ODIN MODE in red written
product name:
custom binary:downloaded:no
current binary: samsung official
system status: custom
thats all that is displayed on the phone only..
I am using a windows 7 ultimate x64 bit
and in ODIN even without seeing the added message I tried to select pda and press start then I got this message in the little message box
Enter CS for MD5..
Check MD5.. Do not unplug the cable..
Please wait..
I9300XXDLIB_I9300OXFDLI1_I9300XXDLIB_HOME.tar.md5 is valid.
Checking MD5 finished Sucessfully..
Leave CS..
All threads completed. (succeed 0 / failed 0)
Simply put, nothing was installed on your device. You should be able to boot properly, thus.
Okay.. try on any other computer. And don’t try to install if you don’t get the Added!! message, ever!
Try this latest Odin, 3.09 – http://filecloud.io/cp43ua5j
ok I will be installing in a window xp sp3 version and let you in few moments..thanks…
I tried with the latest ODIN 3.09 also no message of added successfully…I tried to boot the mobile it it stuck :/
.I will let you know when I am able to install in the window xp sp3 thanks..
Hello there, I tried to do it in the win xp no luck then What i discovered the device is not charging when the device is bricked the usb will not work properly…thus the only solution that one of my friend told me to do is to use another fully charged battery from another mobile then flash it through the sd card slot…
I will let you know if that was successful..
hmm.. try that.. and let us know.
hey there, sorry with no luck…all the parts are working correctly in the mobile but the problem remain only with the software, my friend tried to flash it buy with no luck…
Hey there, this is my last post, well what has just happened is from the mobile…if someone enter in the download mode and the product name field is blank like the one that I have..nothing can be done to get it back..
What has just happened is literally the motherboard has been wiped out completely and it will not be OK..never.
Its time for a customer to claim warranty if s/he has else its time to hold your hands put it on the head and cry for while as the SAMSUNG mobile just died for ever..
It is true and confirmed by samsung developers or other forums…bad luck for me…
hey there, I have done everything you told me but the message ADDED is not shown…..I updated KIES, used latest usb drivers, nor a recovery option crop up only I can get a download option….help anyone the device remain on the galaxy logo only….
Please tell me what did you do exactly. If you didn’t get Added messagem then you must be able to install anything using Odin. And thus, the phone should reboot normally. It appears you installed something wrong… so, please explain what and what you did. And what is your device’s model no.? Check on its packaging box. Or under the battery.
hello there thanks for replying, well I did as you explained in this tutorial..what i did is:
1. tried to enter in recovery mode by pressing the vol up+power+home together…nothing happened… I tried to enter in download mode….I entered in that mode correctly it seems for a change..
2. I did like your tutorial..installed kies let it be updated with the latest version and installed the usb drivers updated..
3. downloaded latest version of odin software 3.04
4. I tried to connect it like you said but nothing happen…
5. The mobile keep staying on the samsung logo screen without changing ( except the fact it can enter in download mode)
6. I tried several usb ports also and my pc is among the latest, am using a core i5 3rd generation so I hope that it is also recent hardware…
7. Am relying on your tutorial only to make this mobile work Am from Mauritius
The Model at the back is : GT-I9300
SSN: A3LGTI9300A
Its has an IMEI and a serial number which I tried in the kies software and it valided it correctly…
please help and advise buddy, I have tried in the past for a tablet Karbonn smart tab9 and I repaired it but this one seems to be tought..
In the step 8 above, you have to boot into download mode, not recovery mode. So, use Volume Down + Power + Home button to enter download mode. Don’t use Volume Up + Power + Home, as that leads to recovery mode.
Once in download mode, Odin will get you Added!! message. And you should be able to do it successfully.
Hello there, i forgot to mention this also…well I tried this one also which I forgot to mention but no message is cropped up in the odin 3.04..nor in odin 1.85…
well when I see the download mode screen : I can see ODIN MODE in red written
product name:
custom binary:downloaded:no
current binary: samsung official
system status: custom
thats all that is displayed on the phone only..
I am using a windows 7 ultimate x64 bit
and in ODIN even without seeing the added message I tried to select pda and press start then I got this message in the little message box
Enter CS for MD5..
Check MD5.. Do not unplug the cable..
Please wait..
I9300XXDLIB_I9300OXFDLI1_I9300XXDLIB_HOME.tar.md5 is valid.
Checking MD5 finished Sucessfully..
Leave CS..
All threads completed. (succeed 0 / failed 0)
Simply put, nothing was installed on your device. You should be able to boot properly, thus.
Okay.. try on any other computer. And don’t try to install if you don’t get the Added!! message, ever!
ok I will be installing in a window xp sp3 version and let you in few moments..thanks…
I tried with the latest ODIN 3.09 also no message of added successfully…I tried to boot the mobile it it stuck :/
.I will let you know when I am able to install in the window xp sp3 thanks..
Hello there, I tried to do it in the win xp no luck then What i discovered the device is not charging when the device is bricked the usb will not work properly…thus the only solution that one of my friend told me to do is to use another fully charged battery from another mobile then flash it through the sd card slot…
I will let you know if that was successful..
hmm.. try that.. and let us know.
hey there, sorry with no luck…all the parts are working correctly in the mobile but the problem remain only with the software, my friend tried to flash it buy with no luck…
Hey there, this is my last post, well what has just happened is from the mobile…if someone enter in the download mode and the product name field is blank like the one that I have..nothing can be done to get it back..
What has just happened is literally the motherboard has been wiped out completely and it will not be OK..never.
Its time for a customer to claim warranty if s/he has else its time to hold your hands put it on the head and cry for while as the SAMSUNG mobile just died for ever..
It is true and confirmed by samsung developers or other forums…bad luck for me…
Try this latest Odin, 3.09 – http://filecloud.io/cp43ua5j