ROOT PACKAGE INFO
| Name | Motochopper Root Tool, Bin4ry Root Tool |
| Warranty | Voids Warranty |
| Stability | Stable without any issues. |
| Root Manager App | SuperUser. It manages root permissions for apps on the device. |
| Credits | djrbliss, Bin4ry |
WARNING!
Warranty may be void of your device if you follow the procedures given on this page.
You only are responsible for your device. We won’t be liable if any damage occurs to your device and/or its components.
GUIDE: ROOT MICROMAX CANVAS 2 PLUS
Before you begin with the instructions below, make sure your android device is adequately charged — at least 50% battery of the device.
STEP 0: CHECK DEVICE MODEL NO.
To make sure your device is eligible with this, you must first confirm its model no. in ‘About device’ option under Settings. Another way to confirm model no. is by looking for it on the packaging box of your device. It must be A110Q!
Please know that this page is meant only for Micromax Canvas 2 Plus. Please DO NOT try the procedures given here on any other device of Micromax or any other company. You have been Warned!
STEP 1: BACKUP YOUR DEVICE
Back up important data and stuff before you start playing around here as there are chances you might lose your apps and app-data (app settings, game progress, etc.), and in rare case, files on the internal memory, too.
For help on Backup and Restore, check out our exclusive page on that linked right below.
► ANDROID BACK UP AND RESTORE GUIDE: APPS AND TIPS
STEP 2: INSTALL LATEST DRIVER
You must have proper and working driver installed on your windows computer to be able to successfully root your Micromax Canvas 2 Plus.
In case you’re not sure, follow the links below for a definitive guide for installing driver for your Micromax device on your computer.
► INSTALL DRIVERS ON ANY PHONE USING PDANET
► INSTALL DRIVERS ON MICROMAX DEVICES
STEP 3: INSTALLATION INSTRUCTIONS
DOWNLOADS
Download the files given below and transfer it to a separate folder on your computer (just to keep things tidy, that is).
MOTOCHOPPER ROOT FILE
DOWNLOAD LINK | File name: motochopper.zip (4.0 MB)
BIN4RY ROOT FILE
DOWNLOAD LINK | File name: Bin4ry.7z (4.1 MB)
STEP-BY-STEP GUIDE
Important Note: Backup important files stored on internal SD card of your device, so that in case a situation arises requiring you to do a factory reset after rooting with these tools, which might delete internal sd card too, your files will remain safe on PC.
METHOD 1: MOTOCHOPPER ROOT TOOL
- Extract/Unzip the Motochopper Root file, motochopper.zip on your computer (using 7-zip free software, preferably) to get the following files:
- adb.exe
- adb.linux
- adb.osx
- AdbWinApi.dll
- AdbWinUsbApi.dll
- busybox
- pwn
- run.bat
- run.sh
- su
- Superuser.apk
- Turn on USB Debugging on your Micromax Canvas 2 Plus.
- Enable developer options: Go to your device’ Settings » select About device » Scroll to the bottom and tap on “Build number” seven times to enable developer options.
- Enable USB Debugging: Open device’ Settings » select Developer options » Tick the “USB debugging” checkbox. (under Debugging section)
- Connect your Micromax Canvas 2 Plus to computer with a USB cable and if a pop-up screen shows up on Phone asking you to Allow USB debugging for the computer, make sure to tick the checkbox and tap OK.

- Connect your Micromax Canvas 2 Plus to PC. Your PC should detect your device. If your PC doesn’t detect your device, here are some troubleshooting tips:
- Make sure you have installed driver for Micromax Canvas 2 Plus as said above in ‘Before you begin..’ section.
- If you have already installed driver, then uninstall them and reinstall back.
- Connect using a different USB port on your PC.
- Try a different USB cable. The original cable that came with your phone should work best, if not, try any other cable that’s new and of good quality.
- Reboot your phone and PC and then try again.
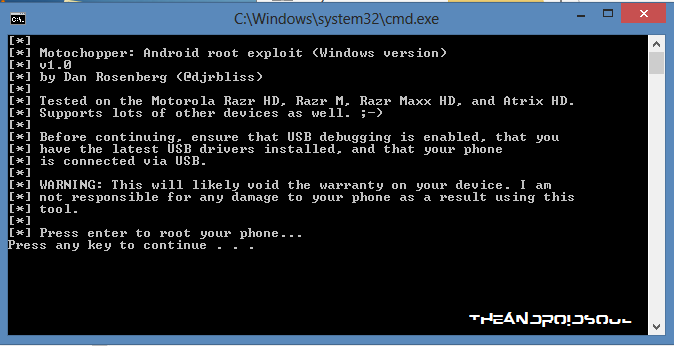
- With phone duly connected, now double click on the run.bat file in the extracted folder. It will open up a command prompt which should be similar to the screenshot below:
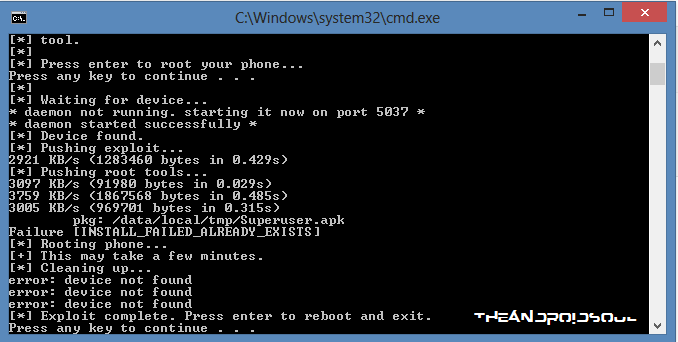
- Now press any key to root your phone. Let the magic happen! The Motochopper will do its job, that is, exploit will run and will install the root package automatically.
- At the end it will show a message “Exploit complete. Press enter to reboot and exit” indicating the process was success. Now hit enter, the phone will reboot automatically.
- After the reboot, you will find the SuperUser app in the app drawer. Congrats your device is rooted!
Thats all, if you have any doubts regarding this feel free to ask us in the comments section below.
METHOD 2: BIN4RY ROOT TOOL
- Connect your phone to the PC and it should detect your phone now. If it doesn’t, make sure you have installed the Driver as we said in ‘Before you begin..’ section above.
- Extract/Unzip the Bin4ry Root file, Bin4ry.7z on your computer (using 7-zip free software, preferably) to get the following files:
- stuff (folder)
- RunMe.bat
- RunMe.sh
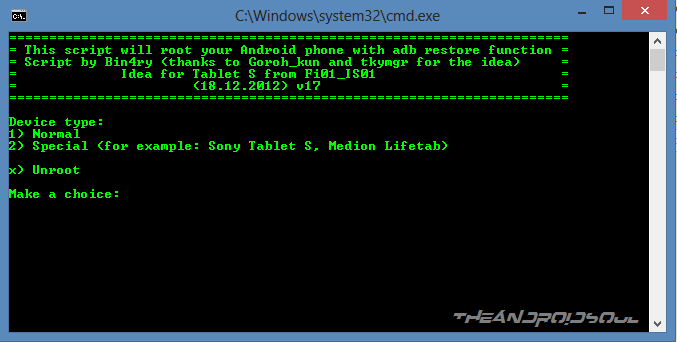
- Now, with your Micromax A110Q connected to PC via USB and properly recognized by PC, click on the RunMe.bat file in the package.
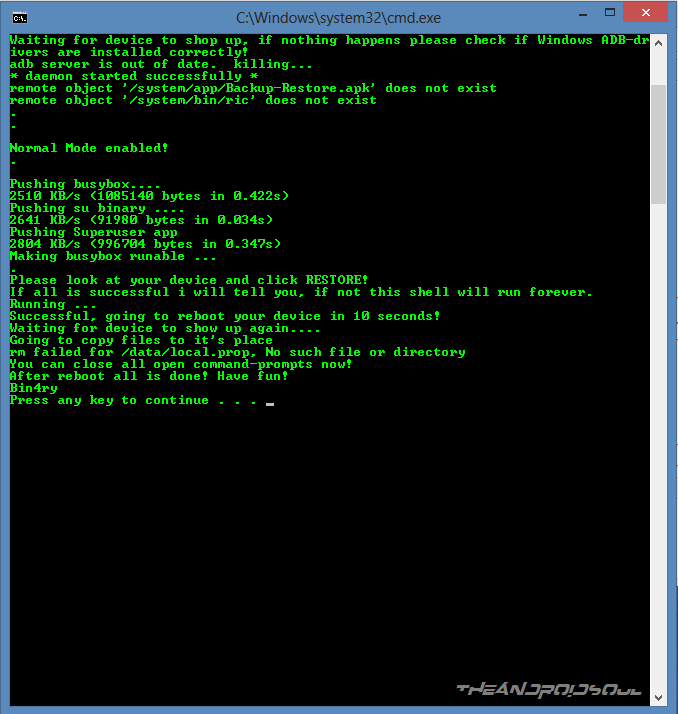
└ Note: Do not run the .bat file as administrator. - It will pop out a command prompt with green text on it. Now enter the option as 1 to select Normal option to root your Micromax A110Q.
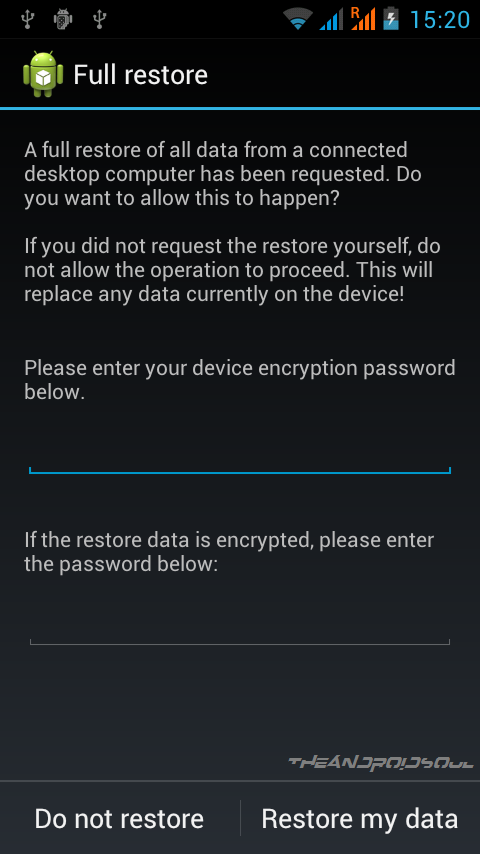
- Look at the phone now you will be asked to restore my data . Press Restore my data. The phone will reboot automatically after this.
- If everything goes well then you will see the screen below in the computer.
- Now disconnect the phone from the PC. If everything goes well with the phone as well, your Micromax A110Q should be rooted by now. And, you should see a SuperSU app in your phone’s app drawer.
Thats all, if you have any doubts regarding this feel free to ask us in the comments section below.
FEEDBACK US!
It was easy to root your Micromax Canvas 2 Plus, right? Let us know how you are plan to utilize root privileges on your A110Q.
Your suggestions and queries, if any, are most welcomed!


super su app didnt appear
super su app didnt appear
super su app didnt appear
How the mobile should be connected to PC ‘Charge Only’ or ‘USB Storage’ or ‘Media Device (MTP)’ with USB debugging enabled?
How the mobile should be connected to PC ‘Charge Only’ or ‘USB Storage’ or ‘Media Device (MTP)’ with USB debugging enabled?
How the mobile should be connected to PC ‘Charge Only’ or ‘USB Storage’ or ‘Media Device (MTP)’ with USB debugging enabled?
hey thanks for sharing the detailed step-by-step guide on rooting my micromax canvas 2 A110Q. I have tried following everything as you mentioned but I am stuck after running the rooting app “motochopper”. After it asked me to press any key to continue, I did that and nothing is happening after the message “daemon started successfully”. I waited for about half an hour. but no result. it still said “daemon started successfully”. I tried restarting my phone as well as the computer but it did not help. It gives the same result. what am I doing wrong? what should I do now? could you please help me.
hey thanks for sharing the detailed step-by-step guide on rooting my micromax canvas 2 A110Q. I have tried following everything as you mentioned but I am stuck after running the rooting app “motochopper”. After it asked me to press any key to continue, I did that and nothing is happening after the message “daemon started successfully”. I waited for about half an hour. but no result. it still said “daemon started successfully”. I tried restarting my phone as well as the computer but it did not help. It gives the same result. what am I doing wrong? what should I do now? could you please help me.