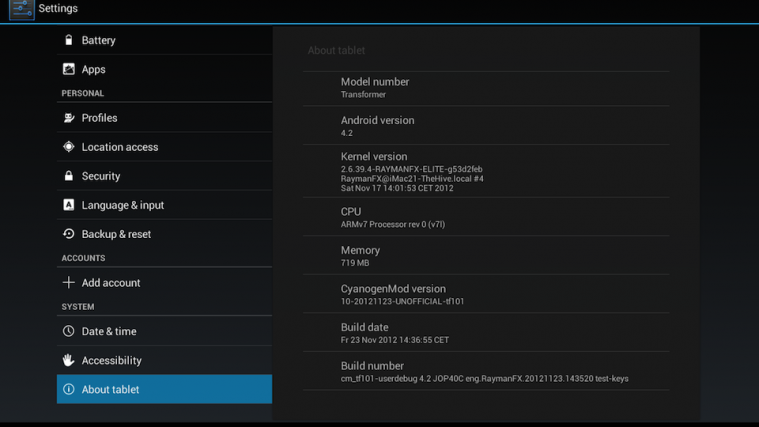
ASUS is usually very quick to roll out updates to newer versions of Android to their tablets, but the original Transformer is now quite old, so ASUS will most probably be updating it to Android 4.2 later than other tablets, if at all. But the Android development community is always working around the clock, and we already have Android 4.2 ported to the Eee Pad Transformer TF101.
XDA Senior Member RaymanFX is the one behind releasing the Android 4.2 ROM for the Transformer, which will get you all the new features from Android 4.2, including a keyboard with Swype-like typing, improved actionable notifications and quick settings toggles in the status bar, multi-user support for tablets, Photo Sphere camera for 360 degrees panorama pictures, and general performance and stability improvements.
However, at this point, the ROM has a few issues, which is normal since it is in its early stages of development. Take a look at the issues plaguing the ROM below, though the source page (linked below) is where you can find the most updated list of issues:
Known Issues (as of Nov 25 2012):
Not working:
- Sound/Audio (Gonna need a new HAL)
- OMX (graphics acceleration)
- Bluetooth
- Camera
Issues:
- Theme section in Settings will force-close
These issues should be ironed out in the coming days, so if trying out Android 4.2 without waiting for the official update is something you want to do, just follow the step-by-step guide below to install the ROM on your ASUS Transformer.
Compatibility
This ROM and the guide below are compatible only and only with the Asus Eee Pad Transformer, model number TF101. It’s not compatible with any other device.
Warning!
The methods and procedures discussed here are considered risky and you should not attempt anything if you don’t know exactly what you are doing. If any damage occurs to your device, we won’t be held liable.
How to Install Android 4.2 on Asus Transformer
- [Important] The procedure to install the ROM includes wiping the data on the tablet, so make sure you backup important apps and data such as SMS, contacts, bookmarks, etc. See our Android Backup Guide for help. The personal files on your SD card, however, will not be wiped, so there is no need to back them up. You just need to take a backup of the installed apps and data such as messages if you want.
NOTE: Don’t forget to at least note down your network’s APN settings, which are required to make mobile data work. Go into Settings » More » Mobile Networks, click on the APN that is in use, then note down the setting for each field. While APN settings should be automatically restored from network, you can enter them manually if needed to make mobile data work. You can also find your APN details → here. - Make sure you have ClockworkMod recovery installed on your tablet.
- Download the latest version of the ROM from the source page.
- Download the addon package from the source page as well. This is needed as otherwise you won’t be able to use the ROM.
- Copy the zip files downloaded in step 3 and 4 to the SD card on the tablet (do not extract the files).
- Turn off your tablet and boot into ClockworkMod recovery. To do so, press and hold both Volume Down and Power buttons. When you see words scrolling at the top left of the tablet, immediately push Volume Up within 5 seconds to make the device enter recovery.
In recovery, use Volume keys to scroll up and down and power key to select an option. - Now, you should make a backup of your currently installed ROM. This is a backup of the whole ROM and will restore the phone to the state it was in before you flash the new ROM, unlike the backup in step 1 which only restores apps and personal data. To take a backup, select Backup and Restore,then select Backup again. Go back to main recovery menu after backup is complete.
- Select wipe data/factory reset, then select Yes on next screen to confirm. Wait a while till the data wipe is complete.
- Now select install zip from sdcard, then select choose zip from sdcard. Scroll to the ROM file on the sdcard and select it. Confirm installation by selecting Yes on the next screen. The ROM will start installing.
- After ROM installation completes, select choose zip from sdcard again, then select the addon package to install it.
- After the installation is complete, select go back and then select reboot system now to reboot your tablet into Android 4.2.
- NOTE: The ROM will get regular updates as development goes on, so be sure to check back on the source page for updated versions. To update to a newer version of the ROM, just download it, put it on the phone, and flash it from recovery, without wiping data. Be sure to flash the addon package as well.
- If you want to go back to your previous ROM, boot into recovery (as given in step 6), select backup and restore, then restore your previous ROM by selecting it from the list.
Android 4.2 is now installed on your ASUS Transformer. Enjoy using the latest version of Android, and also visit the source page to get more details and updates on the ROM. Do let us know how the ROM works for you.


Hi, i’m trying to root my galaxy s gti9000 on xwjw1 firmware but all download links to file are dead 🙁 can you help me please?
Hi, i’m trying to root my galaxy s gti9000 on xwjw1 firmware but all download links to file are dead 🙁 can you help me please?